If you value professionalism, you cannot complete the process of creating a website without paying for a domain name and web hosting. For less professional websites and websites for personal blogging, you can build a free website, with a free domain and web hosting. However, your website address will read “yourbusiness.wordpress.com.” Additionally, the hosting will be severely limited.
Why go through this process when you can secure a domain name and web hosting plan for less than $100 a year?
Where to Get Your Domain Name and Web Hosting
There are many options on the web, but we have done the leg work to choose Bluehost for you.
The basic Bluehost web hosting package starts from $2.95 per month. You also get a domain name free for the first year.
Bluehost is one of the biggest names in the web hosting niche. You can trust them to provide secure and robust web hosting solutions regardless of your unique specifications. Bluehost’s servers are based in the United States but they are properly equipped to power websites from around the globe. You can trust them in your WordPress website design process.
To complete the domain and web hosting registration process, here are the steps to follow:
Choosing your hosting plan
Open Bluehost.com
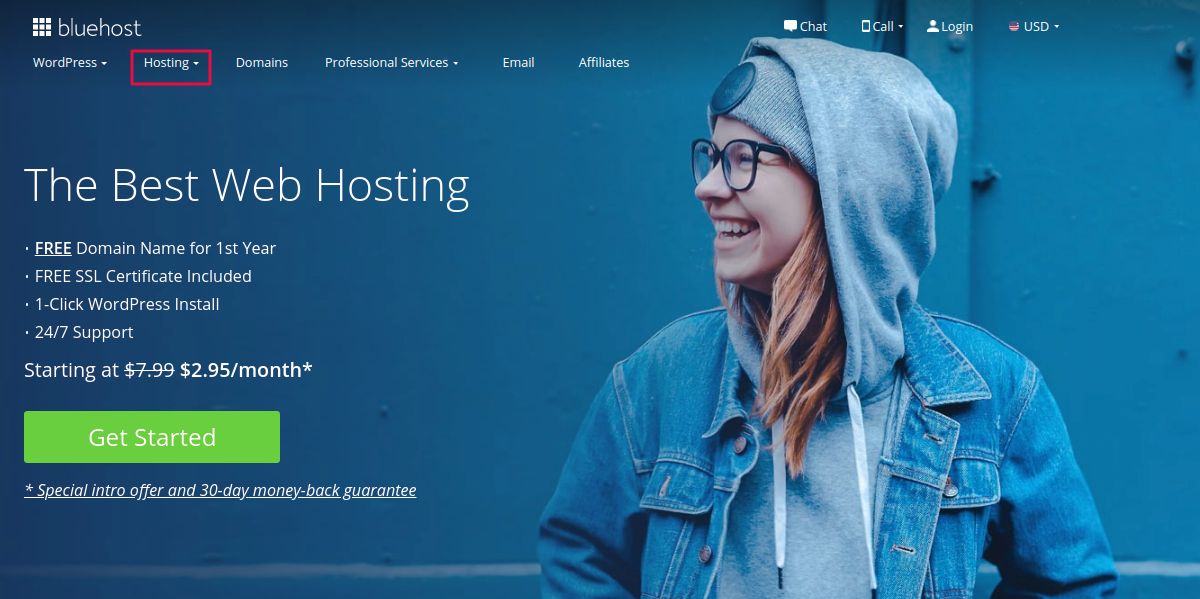
At the top of the page, choose Shared Hosting from the drop-down menu on the Hosting tab and click. It will open this page:

Scroll down to this section to choose your preferred plan or click on the Choose Plan button.

This will take you to the Choose Plan section.

We recommend choosing Choice Plus, the same plan that Bluehost recommends. It has most of what is included in the Pro plan without being overly expensive. It makes for the perfect plan for both individuals and SMEs.
When you select the Choice Plus plan, this page will open where you will need to set up your domain.
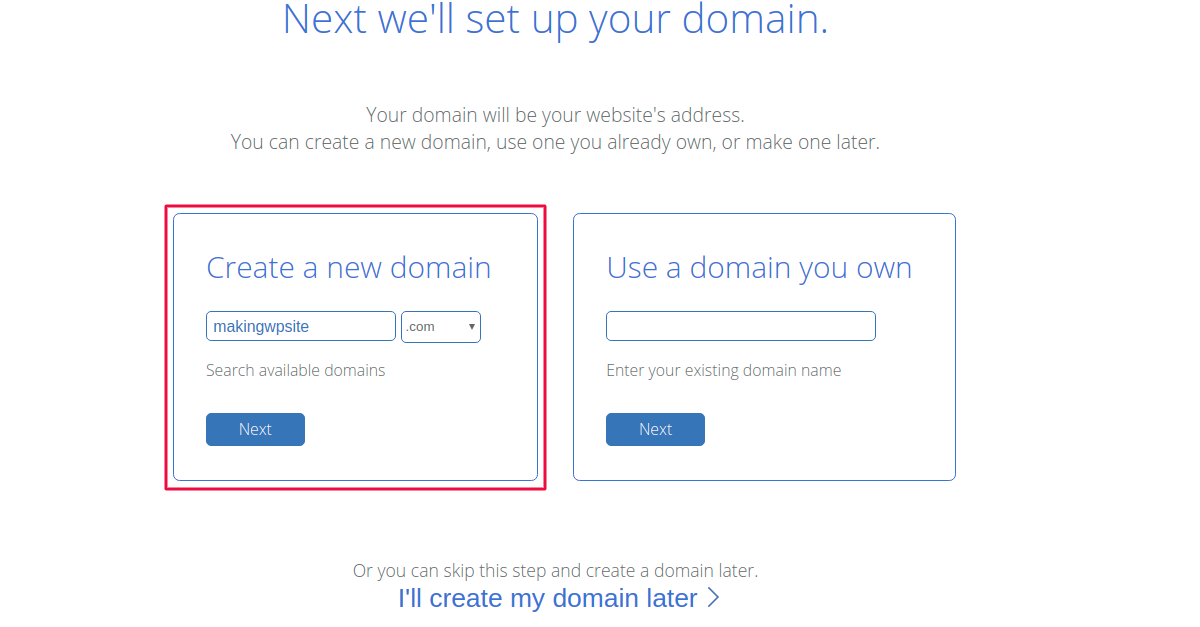
In the event that you already have a domain, you will enter it in the “Use a domain you own” section. If you want a new domain, you will choose to create a new domain. Bluehost offers a list of top-level domains that include .com, .org, and .net.
Others include .online, .site, .website, .space, .tech, and .store, just to name a few. For first time customers, Bluehost offers a free domain for the first year. You can also choose to skip creating a new domain for later.
For users who want to create a domain, the next section is for you. For users who already have a domain, you can skip the next section.
Creating your domain
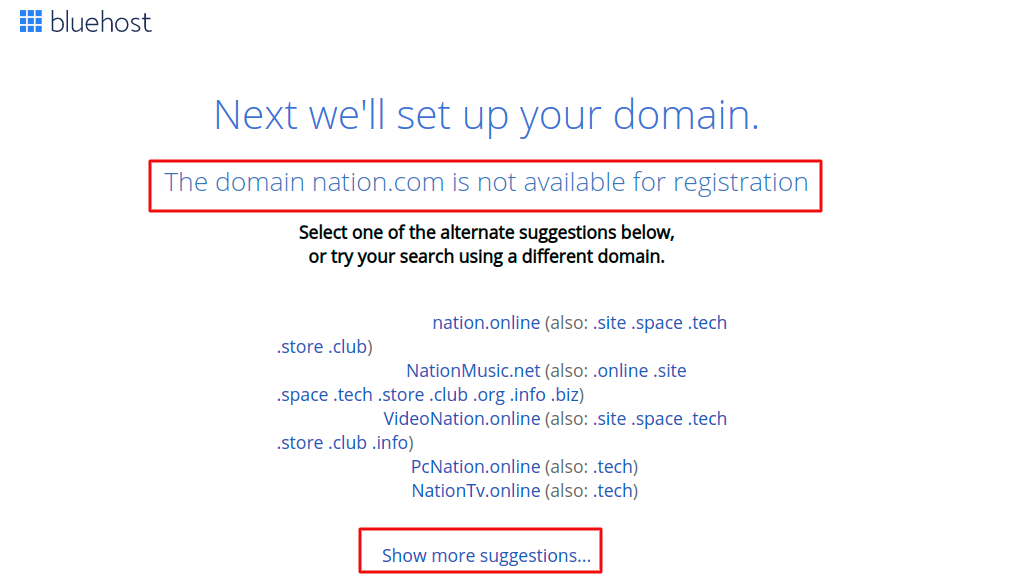
Before embarking on your website building project, you need to create your preferred domain. To do this, you will need to input it in the “Create a new domain” section and check whether it is available.
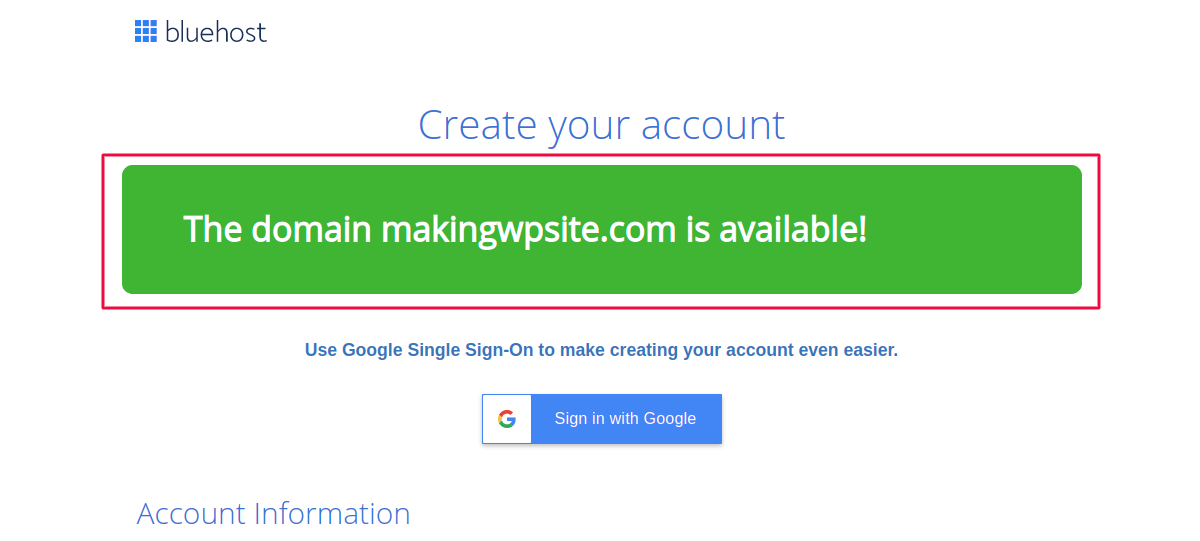
If it is not available, you will need to choose a different one. Bluehost will make suggestions to you based on your search input.
Once you’re settled with an available domain, you can go ahead and set up your account. Here there are two options:
- Use Google Single Sign-On – Simplify the signup process by allowing Bluehost to extract the necessary information from your Gmail account.
- Input your account information.
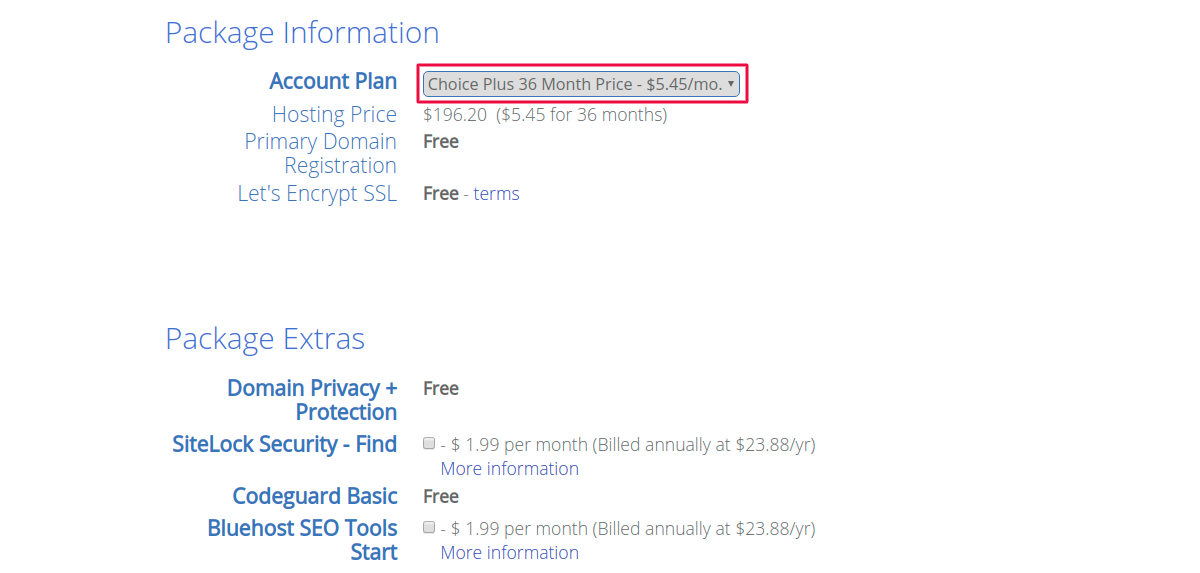
Under Package Information, Bluehost gives you the option to choose one of three billing options: annual, biennial, or triennial. The longer the period you choose the cheaper the per month rate you will pay.
Bluehost offers two payment options:
- By credit card
- By PayPal
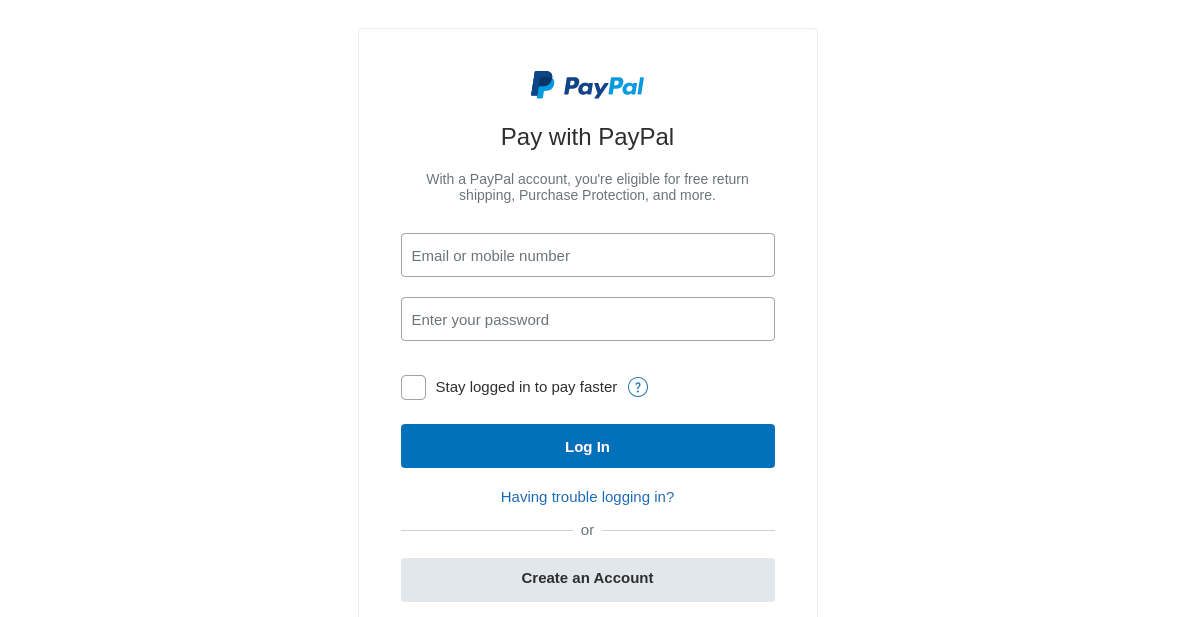
If you choose the credit card option, you will then add your card number and signature or cvv2 code as well as the card’s expiry date. The PayPal option will require you to add your PayPal email address.
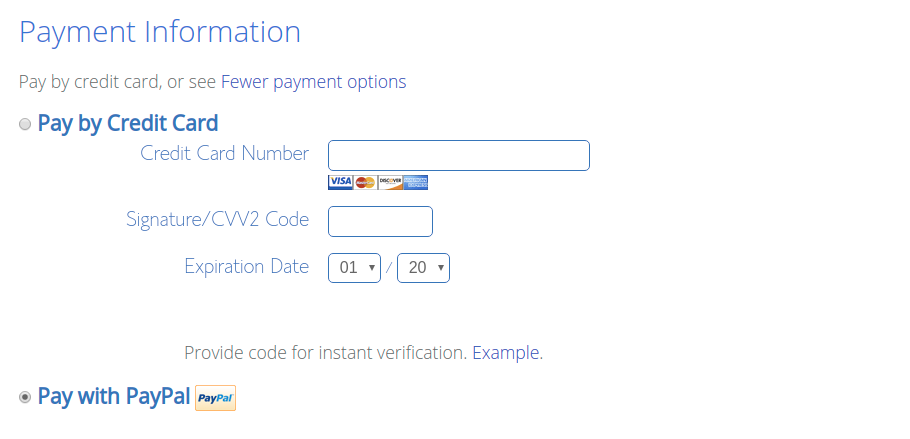
Whichever option you choose, Bluehost will use it for renewals. Unless you change that in your Control Panel. Additionally, the plan will also be automatically renewed unless you choose to cancel.
Once you have verified that all the information is correct, you can go ahead and accept the Bluehost terms of service, privacy policy, and cancellation policy by ticking that section as shown below after a careful read.
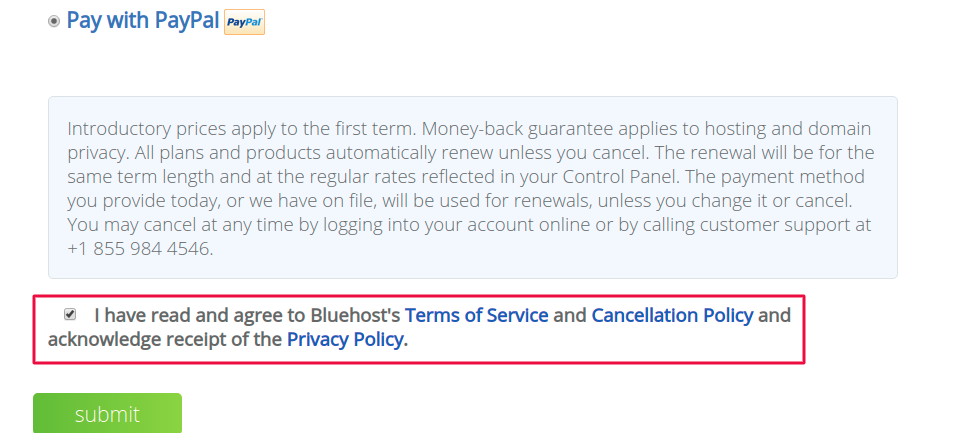
Finally, click on the Submit button in green.
Apart from the free features included in the plan, Bluehost also offers other paid-up features that you can choose to add to the plan. They include
- SiteLock Security – Find
- Bluehost SEO Tools Start

There is also the option of a 30-day free trial of one Office 365 Mailbox. After the trial period, Bluehost offers the Office 365 Mailbox at $2.99 per license per month for the first year which renews at $4.99 per license per month at the beginning of the second year.
After clicking on the submit button, Bluehost will attempt to use the payment option you have chosen to deduct money from your account. If you have selected the PayPal option, you will be redirected to PayPal.com where you can enter your sign-in details to pay.
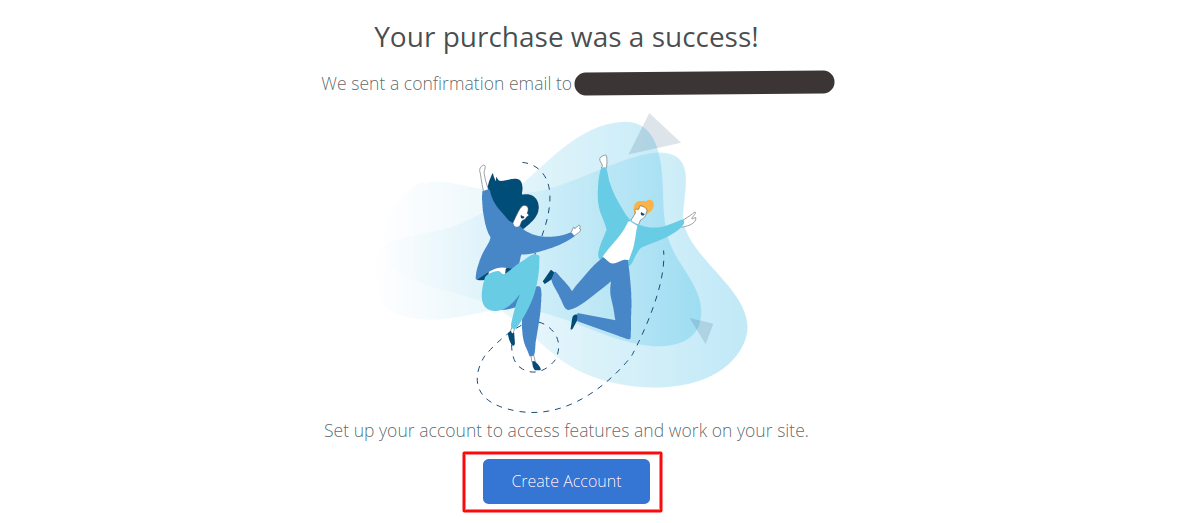
Once the purchase is successful, you will be redirected to this page where you can choose to go ahead and create your Bluehost account or check out the confirmation email sent to your email address.
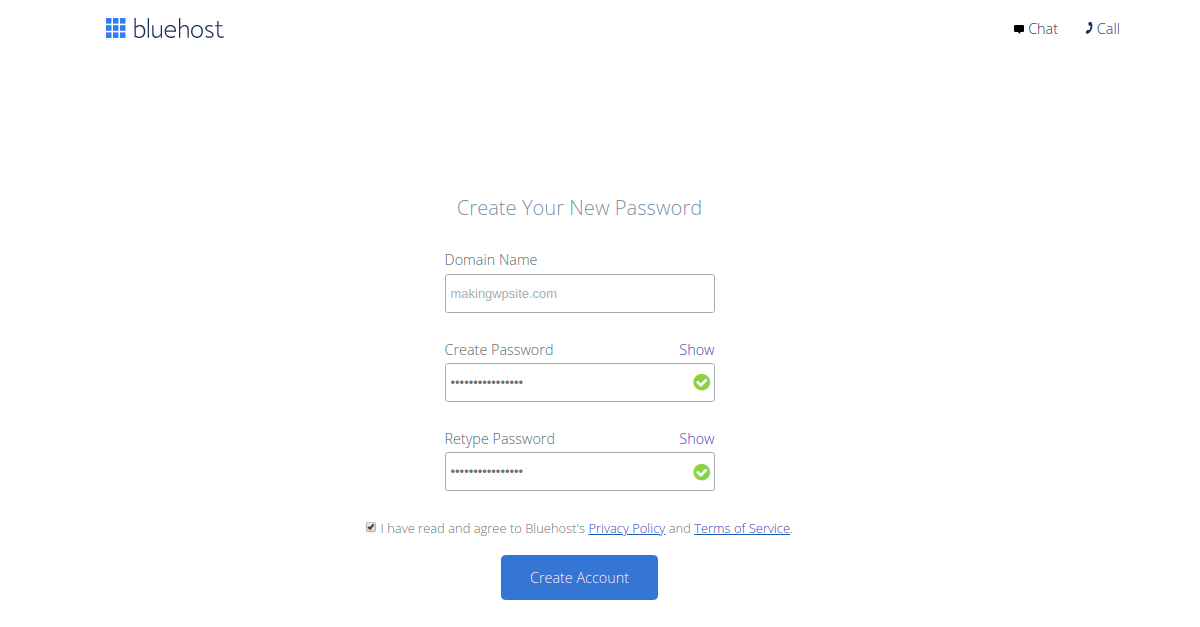
When you click on the Create Account button, you will be redirected to this page where you will need to create a password and accept to Bluehost Privacy Policy and Terms of Service.
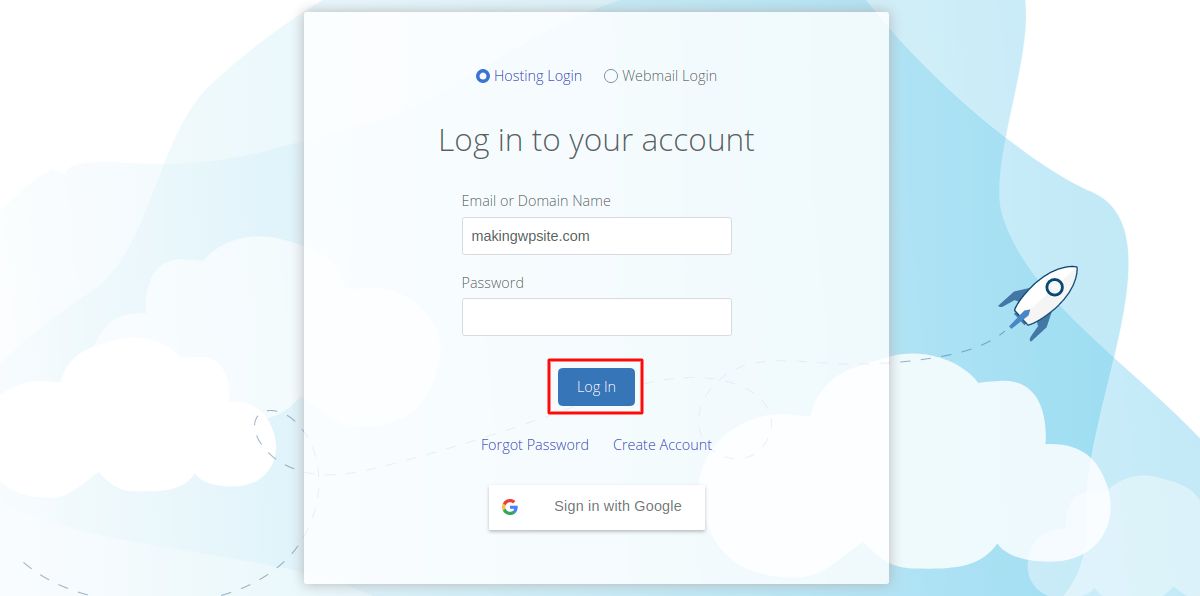
Finally, click on the Create Account button to open the Bluehost login page where you can input your account login details.
There are two ways you can install the WordPress software on your domain. The first one is very easy, thanks to Bluehost’s one-click solution. Another method involves downloading the software on your PC and then uploading its files on the server for manual installation.
You would not need to go for manual process unless you want to try out for the sake of learning.
I have outlined both methods below. Let’s start.
Installing WordPress with One-Click
1. When you log into your Bluehost account, you will be greeted by this screen:
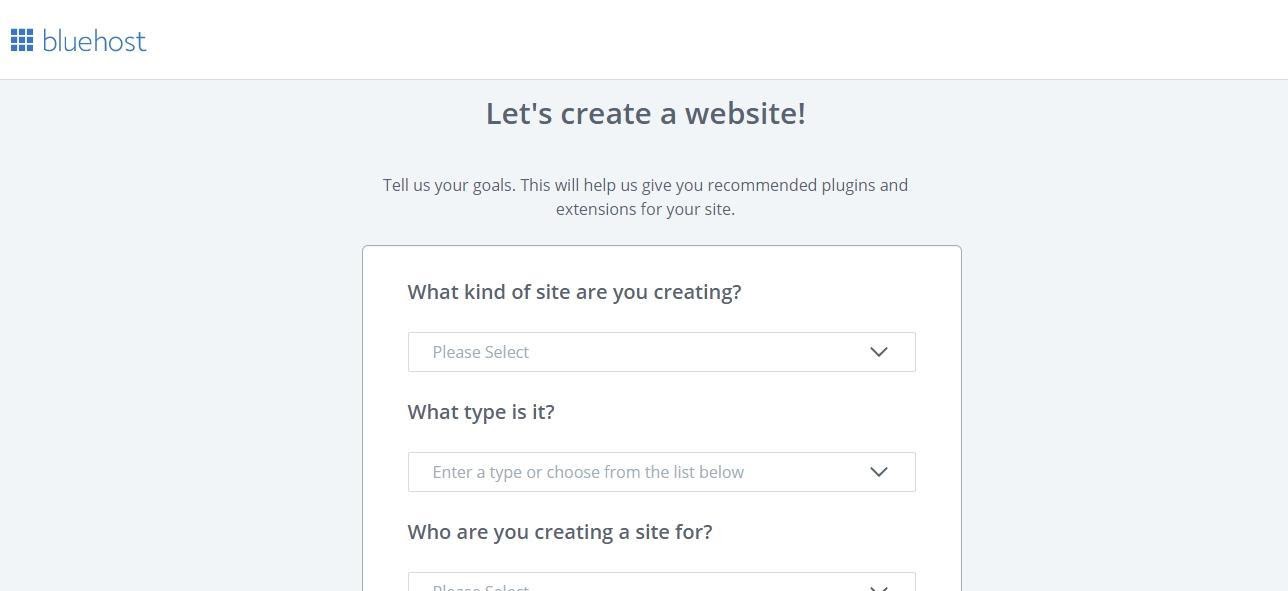
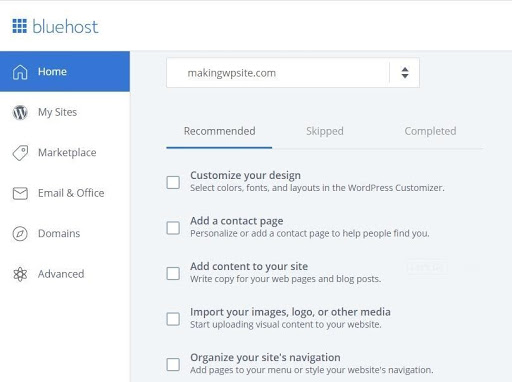
It is designed to help Bluehost understand your website goals, and to further simplify the design process. You can choose to continue with this process or jump straight to setting up your site by scrolling down and choosing to “skip”.
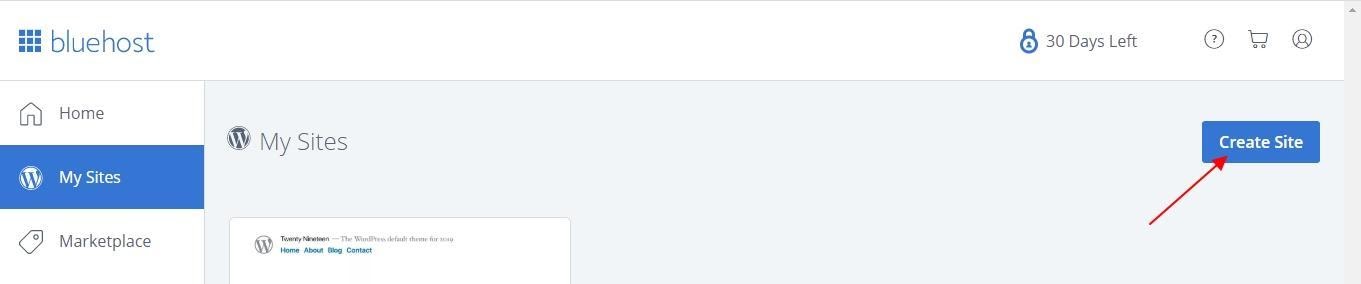
2. After you’ve skipped, click on Create site in the next window:
3. This will bring up a form to fill out the basic details about your website:
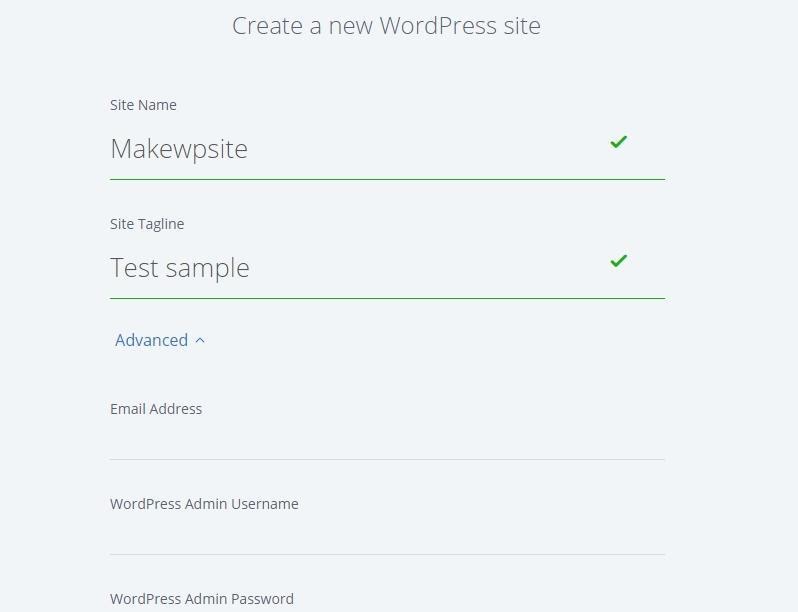
Choose a relevant name for your website and ensure the tagline conveys what your website is about. Toggling the advanced option allows you to fill out details like your WordPress Admin Username and Password. However, this is not compulsory at this point.
4. On the next window, choose the domain name for your website. If you have only registered one domain, this is straightforward. If you have multiple domain names, however, you should ensure that you have chosen the right domain.
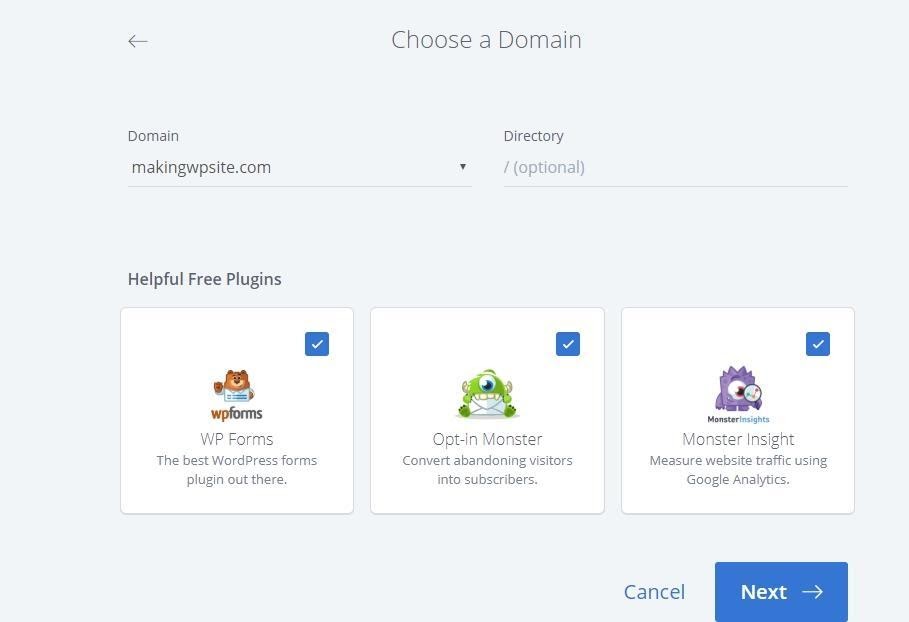
Three free and useful plugins are already preselected, but you can choose to remove any you do not intend to use now by clicking on the checked box. When you are done, click “Next” and your WordPress site will be created. Take note of the login credentials. They will also be emailed to you.
5. The next step is to choose your preferred design elements, from colors and fonts to your site’s navigation:
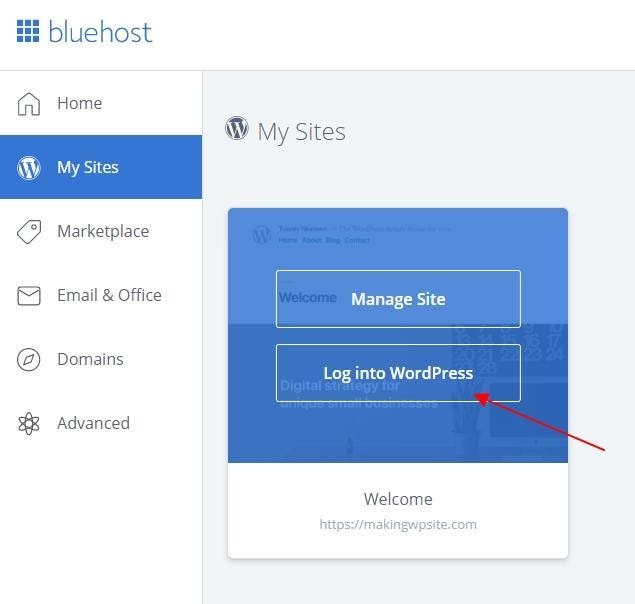
An alternative way to do this is to log into your WordPress Dashboard by using the log-in credentials you have, or to use the menu below:
Once on the WordPress Dashboard, you can continue with other important WordPress customizations as we will discuss below.
This is how you can install WordPress using Bluehost’s one-click option. If you are looking for how to create a website with WordPress on other hosting companies, the process might be a little different. Generally, however, you should be able to install WordPress on any hosting provider that support’s the one-click function by doing the following:
- Log into your hosting account
- Go to the control panel
- Search for the WordPress Icon and click on it
- Choose the domain name of the website
- Click “Install Now”
Most modern web-hosting companies support the one-click function for installing WordPress. If for some reason, however, you are using a hosting provider that does not have this feature you can still install WordPress manually.
The manual installation process is straightforward, but not advisable for a complete beginner. If you don’t like to get too involved in the website creation process, avoid web hosting companies that do not support automatic installation for WordPress.
How to Install WordPress Manually
Stage 1
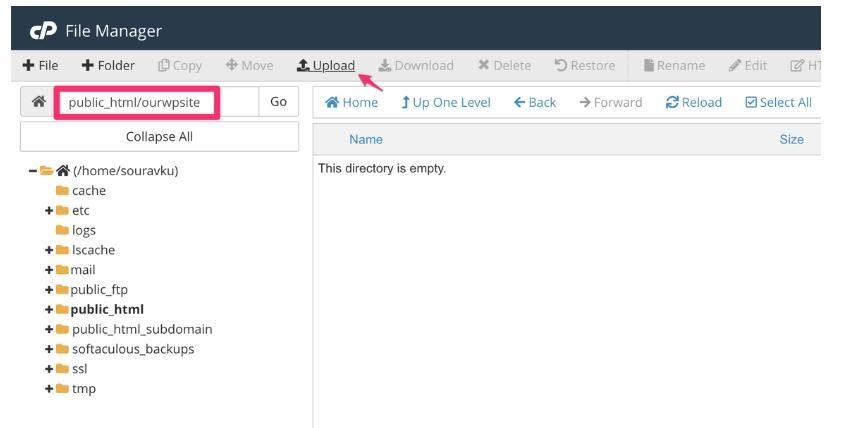
1. Download the latest version of WordPress from https://wordpress.org/download/ and upload the zip file to your hosting through the cPanel File Manager.
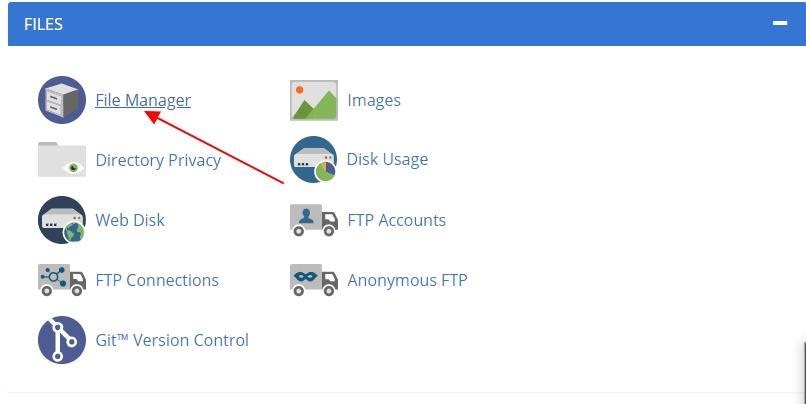
Once you have clicked on the file manager, it will bring up the window below:
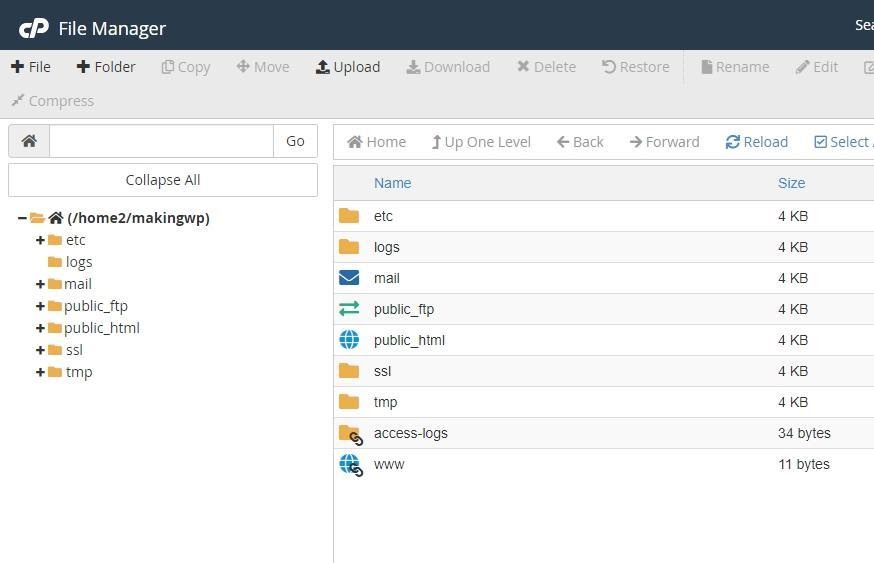
2. Decide Your WordPress Directory. If you’d like the HTML of your WordPress site to read www.yourwpsite.com, then install WordPress in the public_html folder (or the www directory). This means you have installed WordPress in the root directory. If you’d like to keep your domain pointed to another root page, create a new folder for your WordPress under the www directory. With this, the address for your WordPress site will be www.yoursite.com/ourwpsite with “ourwpsite” being the name of your WordPress site.
3. Navigate to the folder you have chosen in step two above and click on upload. This will bring up a new tab. Choose the wordpress.zip file you have already downloaded from the menu and your upload will start automatically.
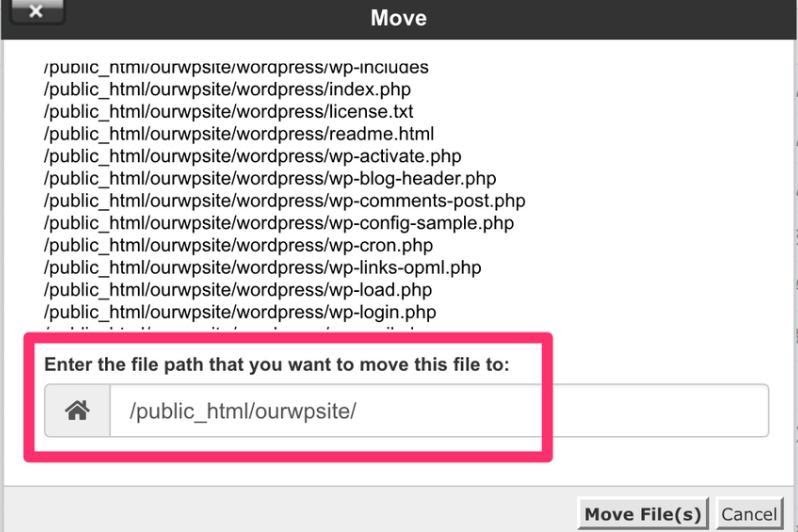
After the upload is completed, close the upload window and return to the File Manager, where you should see the WordPress.zip file in the “ourwpsite” directory. Select the WordPress ZIP file and click on “extract”. Don’t change the extraction directory.
4. At the end of the extraction, reload the File Manager (not your browser) and you will see a folder called WordPress. Open the folder and move the contents to the “ourwpsite” directory. If you don’t do this, the address for your new WordPress site will change to www.yoursite.com / ourwpsite / wordpress. To do this, click on “Select All” while inside the folder and it will bring up a new dialog box asking you to choose the destination folder for the files you have selected.
That completes stage one of the process.
Stage 2
This stage is all about creating a new MySQL Database and a User. Without this, your WordPress site cannot store its text and configuration data.
1. Launch the MySQL database wizard in cPanel.
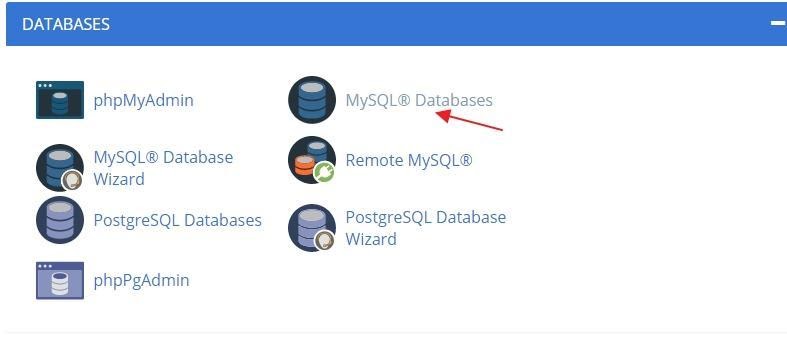
The window below will appear:
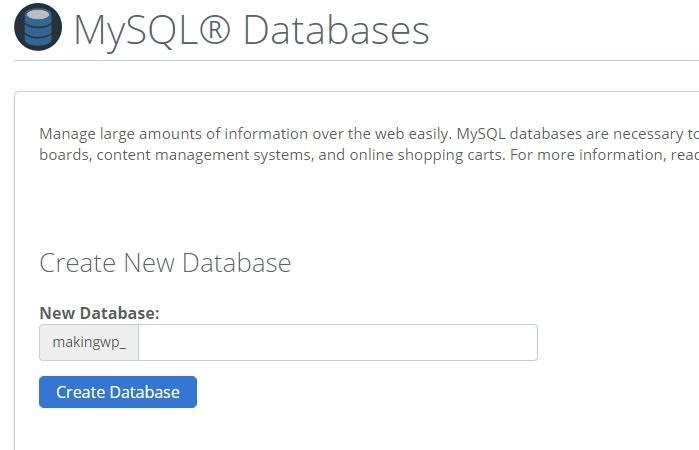
Ensure you create a unique database name by combining alphabets and numbers.
2. After you have created the database, create a new user in the same window.
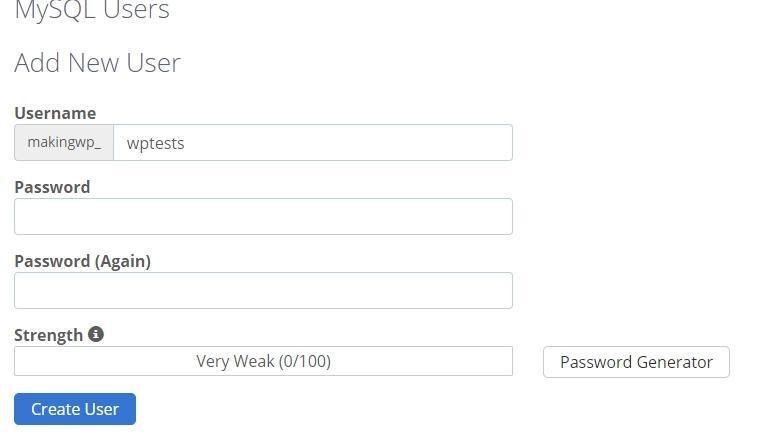
Use the password generator to create a strong password, but don’t forget to save it securely. Click on “create user” and continue.
3. Connect the user you have created, to the database.
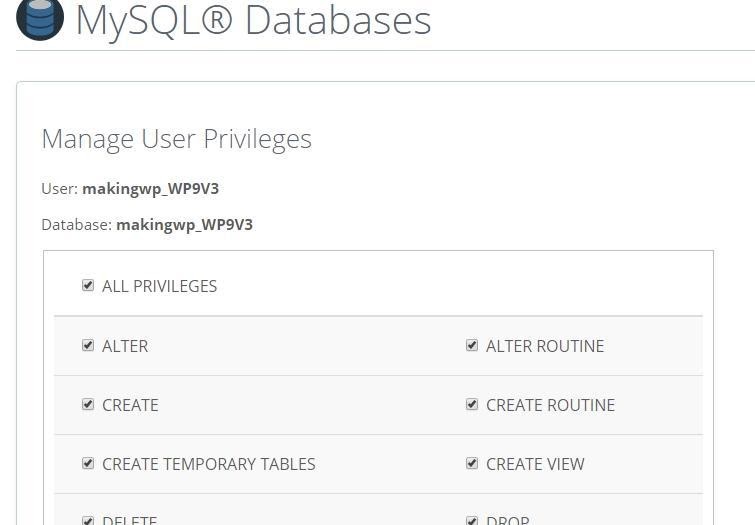
Ensure the box for “all privileges” is checked. This will give the user all the necessary permissions to use the database. Scroll down and click on “Next” to effect all the necessary changes. Once this is done, you have successfully created a new user and a new database. You can proceed to stage 3.
Stage 3
This stage is the WordPress 5-Minute Installation. To begin, go to your WordPress directory by visiting the website link, not through the cPanel. Maintaining our example above, that would mean visiting www.yoursite.com/ourwpsite to launch the installation process.
Choose your preferred language in the first window and you can proceed to the next window where you will enter the details you have created in stage 2:
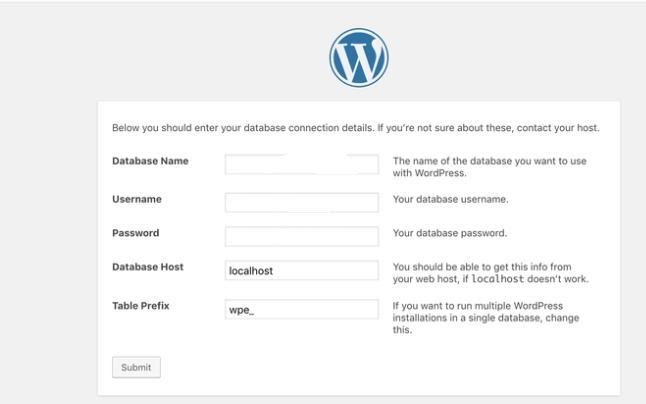
Generally, the table prefix will be set to “wp_”. Do not use this as it will make your site easier to get into for cyber attackers. Add another value to it (letters or numbers). Click submit and you should have the following:
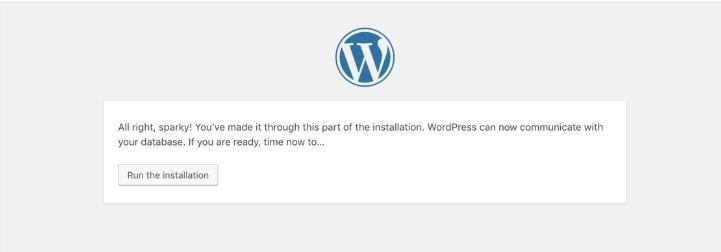
Click on Run the installation and the setup process will begin. Once you see the screen below, you have completed the installation process. However, you are not done quite yet:
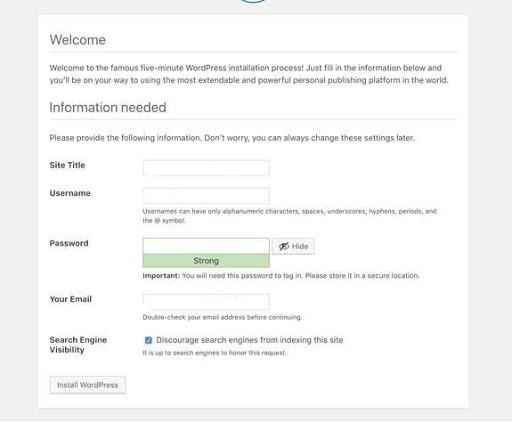
You have to enter the username, a strong password and the email address that you will use for your WordPress site. Don’t forget to choose a username that is not the generic “admin”. Use the password generator again to ensure you have a strong password. Don’t forget to save all the details generated securely.
Leave the “discourage search engines from indexing this site” checked since you don’t have any content on your website. This can be enabled later. If you are expecting to populate the site with content almost immediately, however, you can ignore this. Click on “install WordPress” and you will see the window below after a short while:
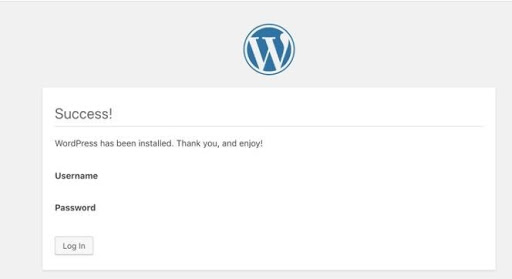
With this, you have successfully installed WordPress manually. When you log in with your credentials, you will enter the WordPress dashboard for your site. From here, you can make some more important changes.
Although you have learned how to create a WordPress website manually, only use this option where absolutely necessary to save time and energy.
After you have completed the WordPress installation process automatically or manually, you can access your website. The first thing you will notice is that the website is basic. This is where you can flex your creativity muscles to bring your website up to the standards you want. You can achieve this by doing the following:
Choose a Theme
Your site currently runs on a free theme. You can choose other free themes by clicking on “Appearance” and then “Themes”.
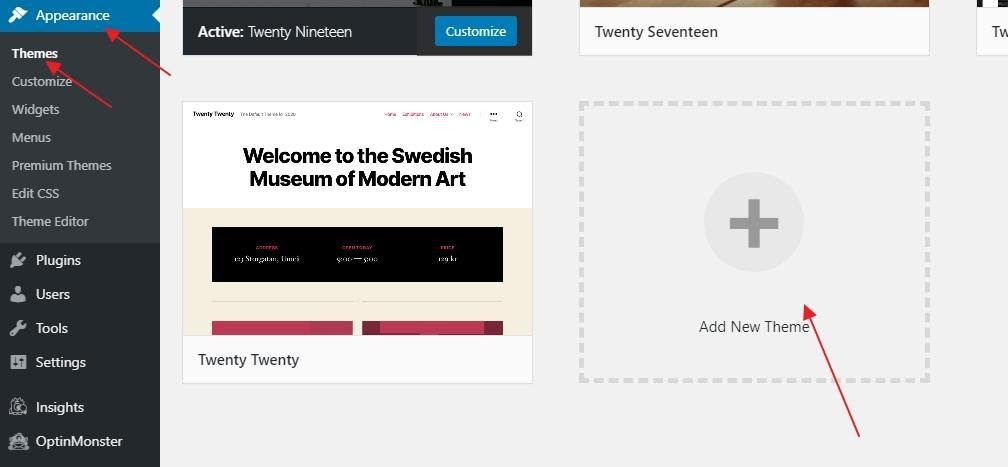
Clicking the “Add New Theme” option will take you to more than 1,500 theme options for your website. The themes are divided into “free” and “premium”. Depending on your goals, you can choose to go with free themes or pay the cost for premium themes.
You can also visit ThemeForest.net, one of the biggest WordPress theme libraries, to find more premium themes at different price points. Spend some time to analyze the free themes before paying for a premium one. You might find one that works as some of them are designed for professional use. If you don’t pick the standard selections, you can find a free theme that can make your site stand out.
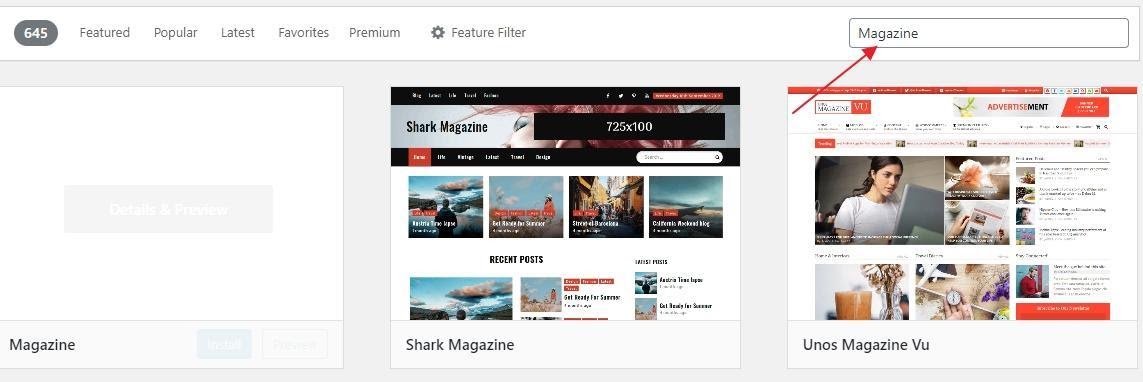
When searching for a theme in the WordPress market or anywhere else, use keywords that are relevant to your website to bring up the right options. For example, if you are launching a magazine-style page, using the keyword “magazine” in the search box will bring up numerous options.
You may have to search for a while to find the right theme option. However, it is necessary. Remember, your theme will determine how your website looks.
Don’t forget to only choose WordPress themes that are responsive. With such themes, your website will automatically resize itself in line with the device being used by your website visitor. Most of the themes available today are responsive, but it is still important to check and be sure.
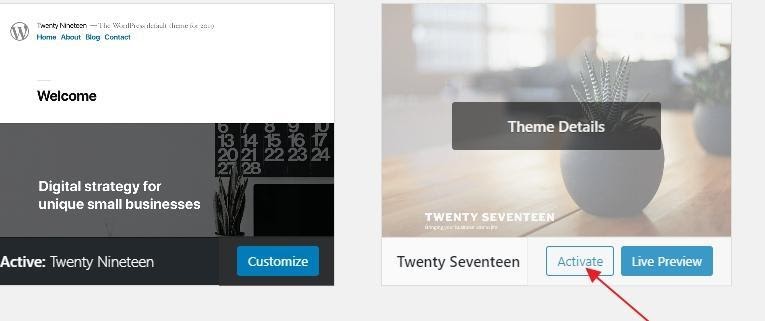
Once you have found the right theme, click on “Install”. After the installation is complete, click on
“Activate”.
One of the many perks of using WordPress is that it is super easy to switch themes. You will not lose any information or any content you have already created. So do not dwell too much on choosing a theme.
Adding Content to Your WordPress Site
The ease of the content management process is one of the reasons why many people learn how to build a WordPress website.
In WordPress, your content will be typically divided into pages and posts. Pages are static. You create them to meet specific purposes such as telling people about your website (About Us page), how to contact you (Contact page), etc. Posts, on the other hand, are regular content you publish (your blog posts, infographics, etc.) and they will be ordered from the newest to the oldest when you open your dashboard.
Your posts are displayed as the front page of your website on WordPress. This is the default setting, but you can change it if you’d rather have something else as your front-page. In fact, many people create a static home page and then create a separate page for the blog or news section.
If you do not have the content for your pages and posts, you can create place holders and edit the pages later. To get started with adding pages, here’s what you should do:
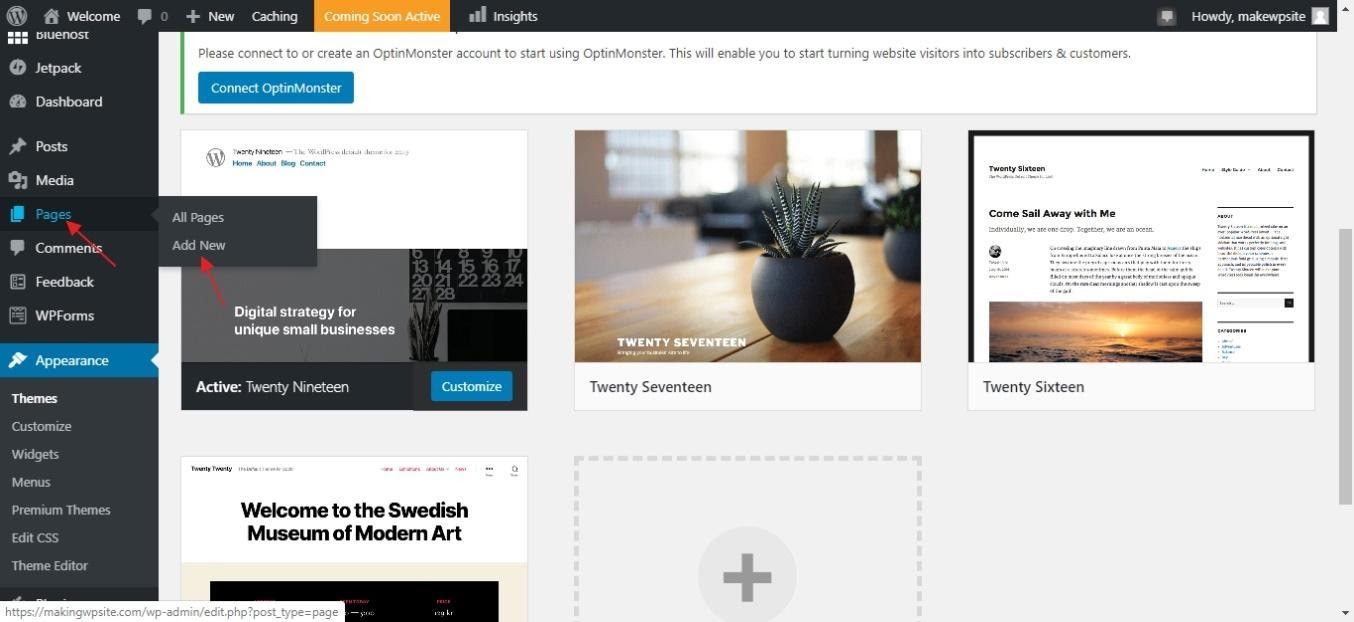
On the main WordPress dashboard, look to the left and find “Pages”. Click on it to bring up “Add New”.
This will bring up the WordPress Page Editor:
The text editor in WordPress is intuitive and contains all the formatting options you will ever need. Create the title of the page, and then you can add the rest of the text below. You can quickly add links, images, embed videos, audio, infographics and any other types of content you need.
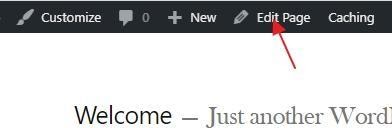
When you are done adding the content for the page, click on “publish” and the page will go live on your website. Any visitors can see it. If you’d like to edit the content after it has gone live, simply visit the page while logged into your WordPress and you will find the following the micro-dashboard in the image below with the edit page function:
Alternatively, you can go back to the main dashboard to bring up a list of your pages and edit. You can repeat this process to add all the pages you need on your site.
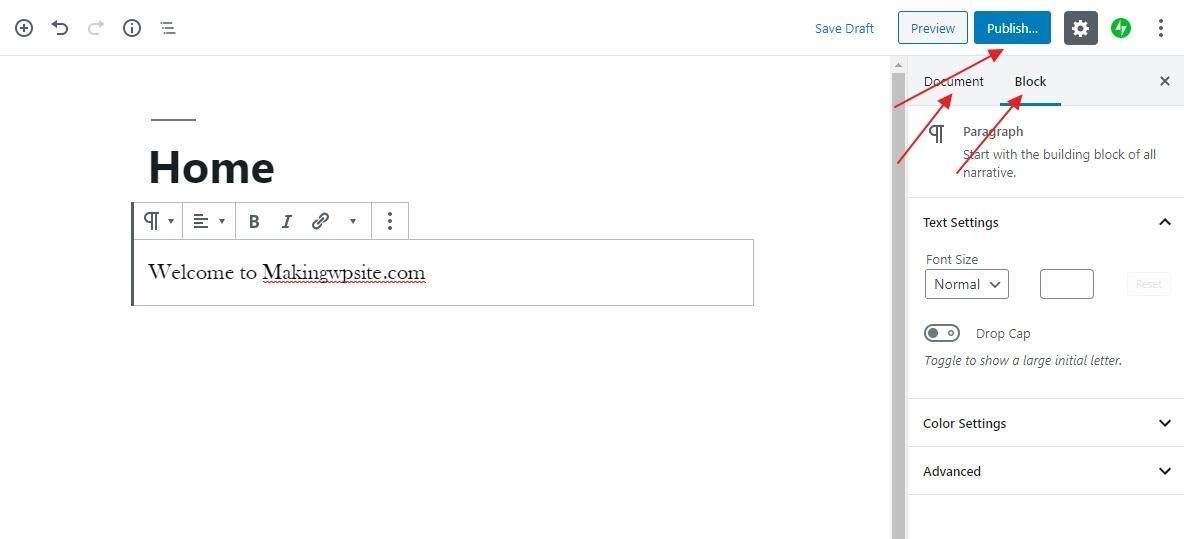
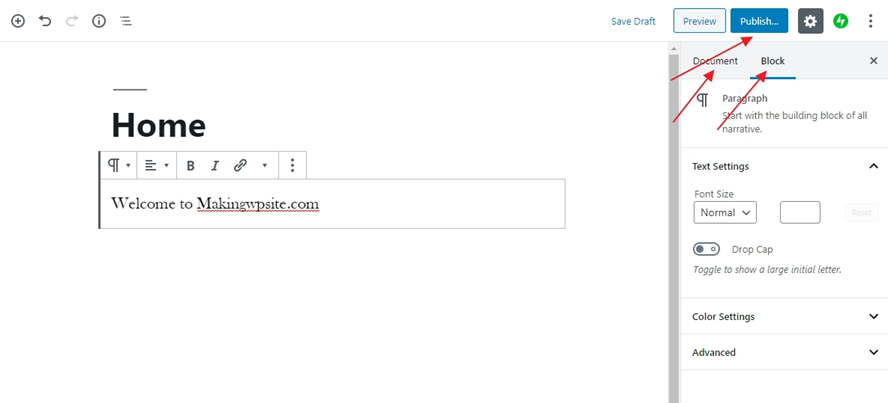
An important point to keep in mind when using the WordPress text editor is that you can make changes to the entire document or to the specific block you are working on. Click on the tabs highlighted below to bring up the modifications you need.
To add blog posts, the process is the same. The only difference is that you have to click on Posts> Add New in your dashboard.
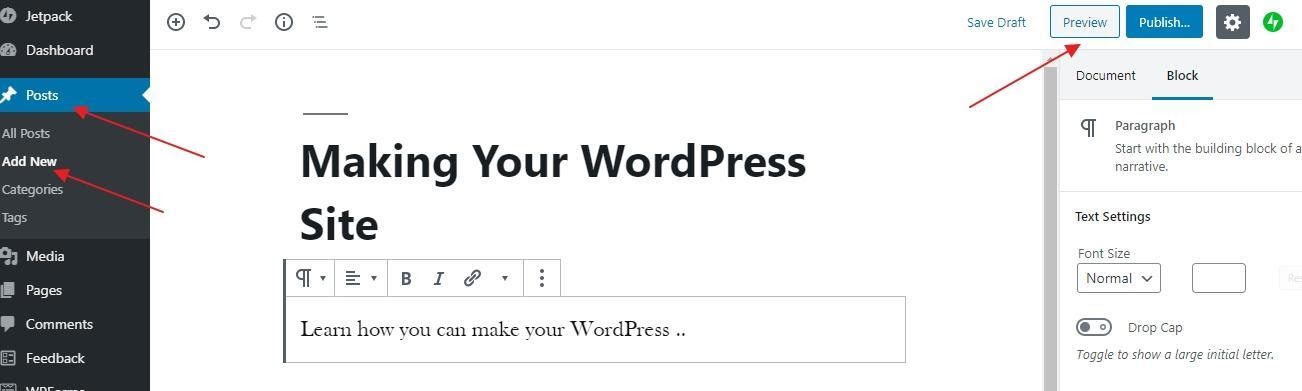
The text editor is the same. Add your blog title and content in blocks. Use the formatting options to create the perfect post and publish it. The preview function allows you to see how the post looks before you publish. If you are happy with the outcome but do not want to publish a post just yet, you can hit “save draft.”
As we mentioned earlier, clicking the document tab under “Preview” will bring up features that affect the entire post. Some of these are important such as Category, Tags and the Publishing schedule.
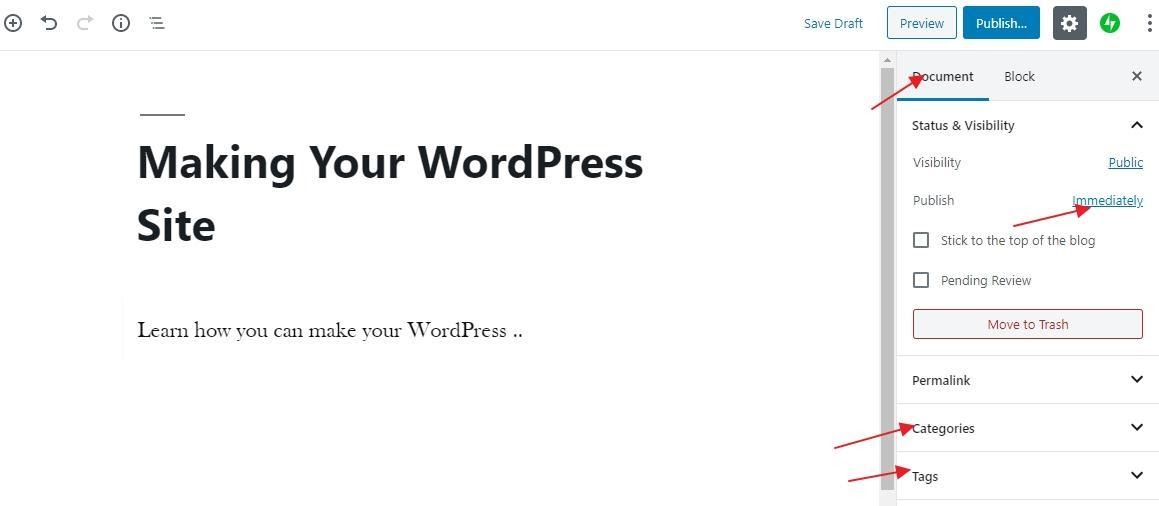
Categories make it easy for you to put your blog posts into broad groups while tags are micro-categories that better reflect the content. So if the category of your post is “Travel”, for example, the tags can be “solo travel” “cheap travel” etc.
If “Publish” is set to “Immediately”, you post will go live immediately you hit publish. However, clicking on “Immediately” will bring up the option of scheduling your post for a later date:
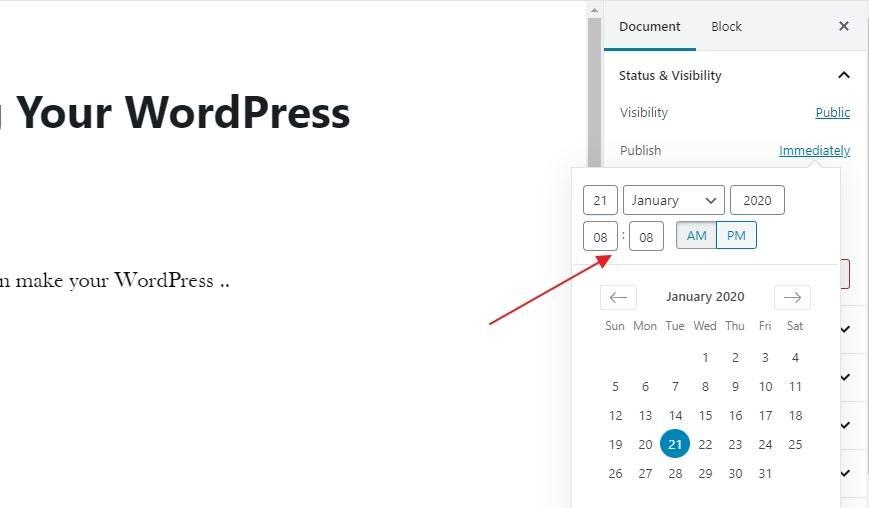
This makes it easier for you to manage your content plan. If you only have one week to write posts for your blog, for example, you can create and schedule each post to go live at specific dates.
When you have published a post, you can still edit it as we described above.
Creating a Static Front Page
If you don’t want your Home Page to simply be a list of your latest posts, you can create a specific Home Page and direct WordPress to display this instead by clicking on “Settings” and then “Reading” in your WordPress dashboard. Change the “Front Page Displays” from “Your Latest Posts” to “A Static Page”. From the drop-down, choose the Home Page (or any other page) you’d like to use instead.
Typically, you should set the Homepage to “Home” (after you have created a page with that content) and set the posts page to “Blog” to display your latest blog posts.
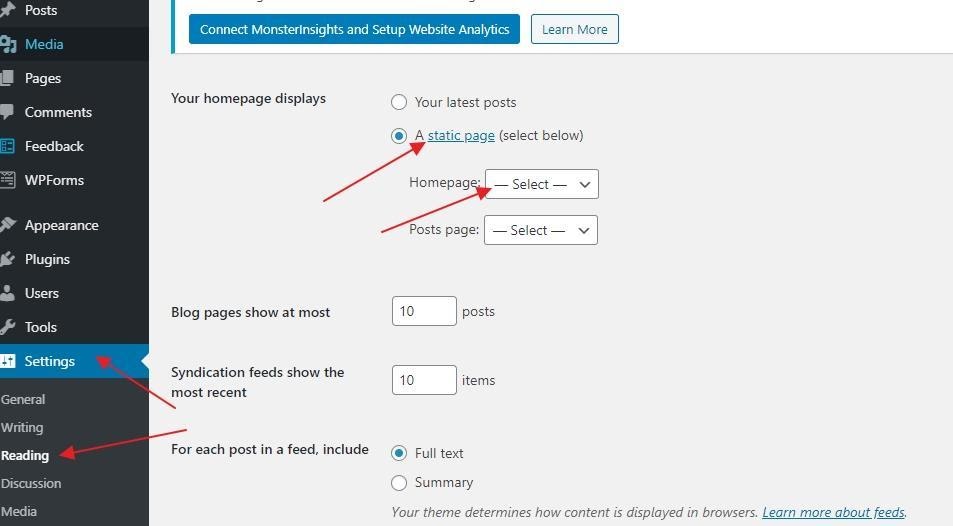
When you are done, scroll down to click on “Save Changes” to ensure all your changes are stored.
Create a Unique Site Title and Tagline
For a newly created WordPress site, your tagline will read “Just another WordPress site”. You may have also chosen a site title during your installation process that you’d like to change now. How can you do this?
In your WordPress Dashboard, go to “Settings” and click on “General” to bring up the right page.

Your site title should reflect your domain name. So for us, that will read MakingWPSite. The tag line should describe in a short sentence, what your site is about. Make it memorable. This is not compulsory, however, so you can leave it blank if you cannot think of a memorable tag line yet. Once you have a tag line in the future, you can come back to change it.
When you have entered the details, click on “Save Changes” to store your new settings.
Setting up for Comments
If you are creating a blog, you’d ordinarily want to welcome comments from your readers. WordPress makes it easy for users to leave comments by default so you don’t need any special tools for this. Unfortunately, spammers take advantage of this to spread dubious links.
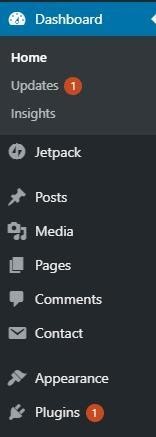
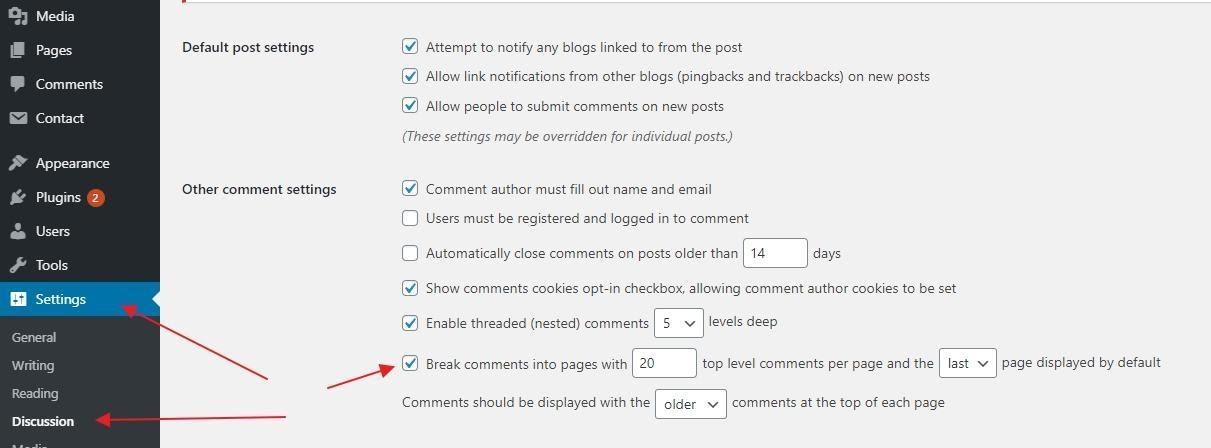
To properly set up for comments on your WordPress site, click on “Settings” and “Discussion”. To bring up the window below:
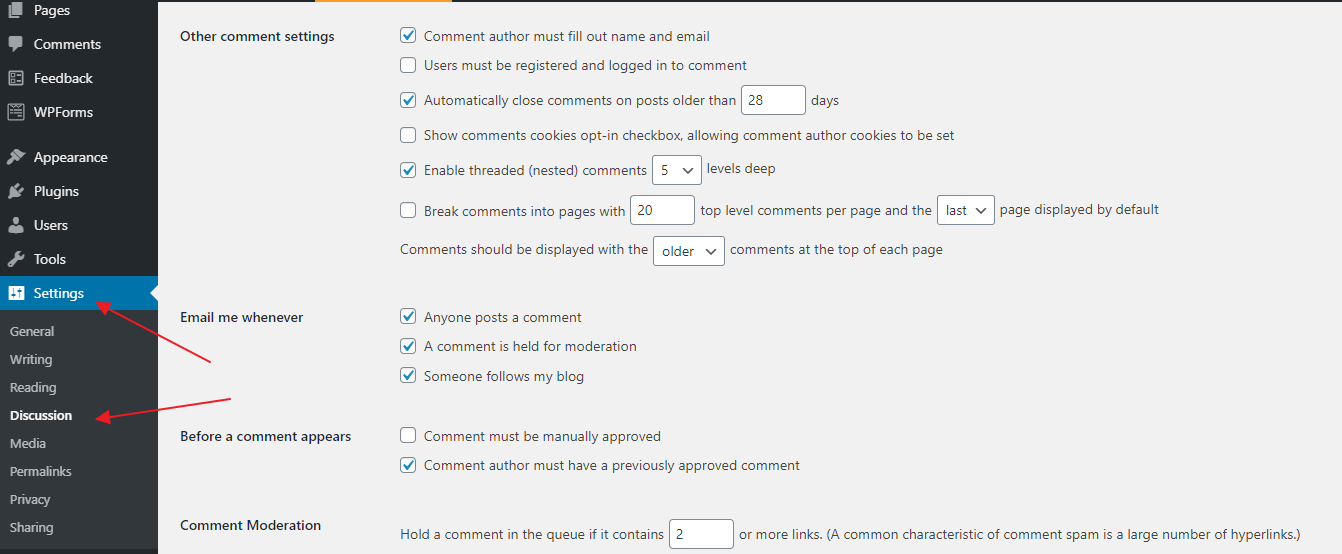
The settings are self-explanatory. Choose the options that appeal to you. In the early days of your Website, you may allow comments indefinitely and set the “Email me whenever” to get a notification on all comments and new blog followers.
However, as it grows bigger and you start to receive numerous comments, it may be necessary to put limits such as closing comments on old posts. Additionally, you will struggle to cope with emails about comments if your website receives more than a dozen comments per day. Imagine when it grows to 100 comments!
To prevent spam, check the boxes under “before a comment appears”. A user with a previously approved comment is likely a genuine reader, but it is best to check the “Comment must be manually approved box” in your early days.
The “Comment Moderation” tab contains further options for blocking spam as it allows you to automatically hold content with a specific number of links for moderation. Many spammers enter two or more links in the comment but to be absolutely safe, you can set this function to withhold comments with any links at all for moderation.
If you’d rather not have comments on your post, you can also make the changes on the page.
When you have selected all that is applicable to you, scroll down to click on “Save Changes”.
Creating Navigation Menus
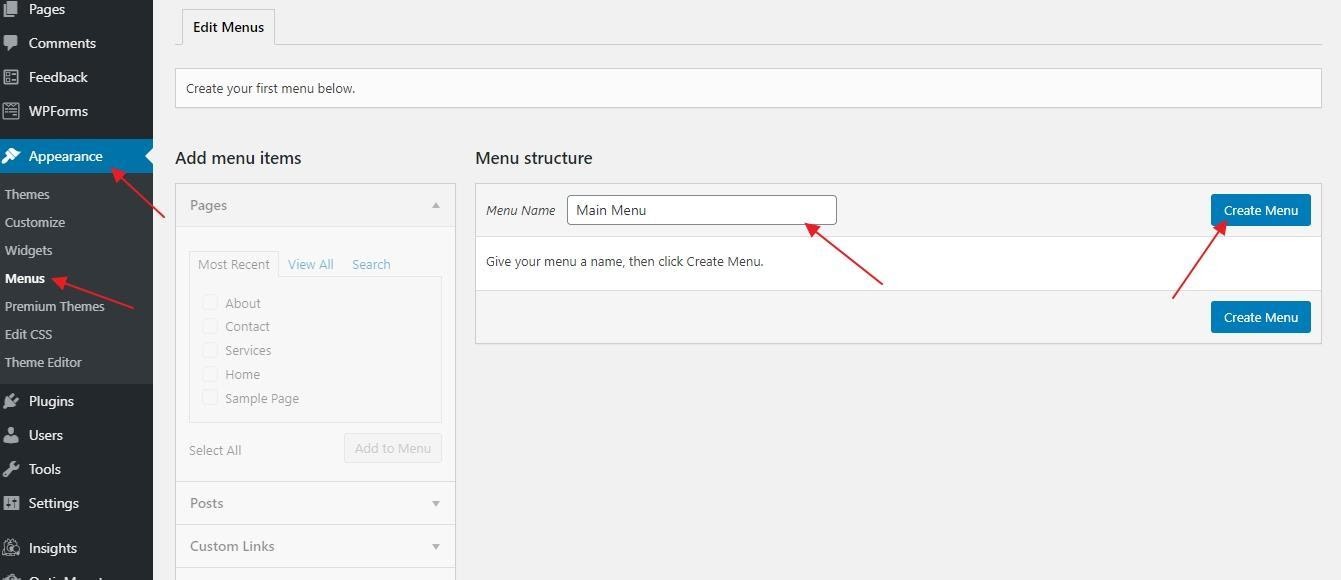
When you look at the top of most websites, you will find elements like Home, Services, About, etc. This is called a navigation menu. Such menus allow website users to find important pages on any website quickly. WordPress makes it easy to create these pages. Here is how you can create yours.
In your WordPress Dashboard, click on “Appearance”, then “Menus”. On the window provided, create a name for your navigation menu. Click on “Create Menu” to proceed to the next stage.
Your Menu is created after this stage, but if you view your site, it will not be visible yet. To complete the process, select the pages you have created, choose the display location and click on “Save Menu”.
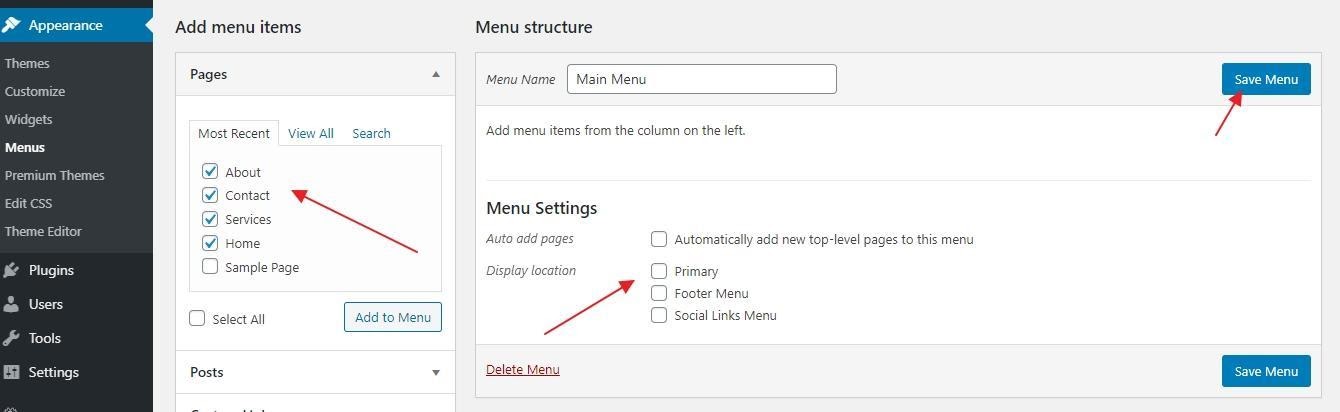
When choosing the display location for your menu, selecting “Primary” places the menu towards the header of your website. Selecting footer places the menu at the foot of your website.
Depending on your WordPress theme, it is possible that your menus will not show on your website after you have reached this stage. If this is the case for you, follow the steps below:
In your dashboard, click on “Appearance” and then “Customize”

On the new page that loads, click on “Menus”.
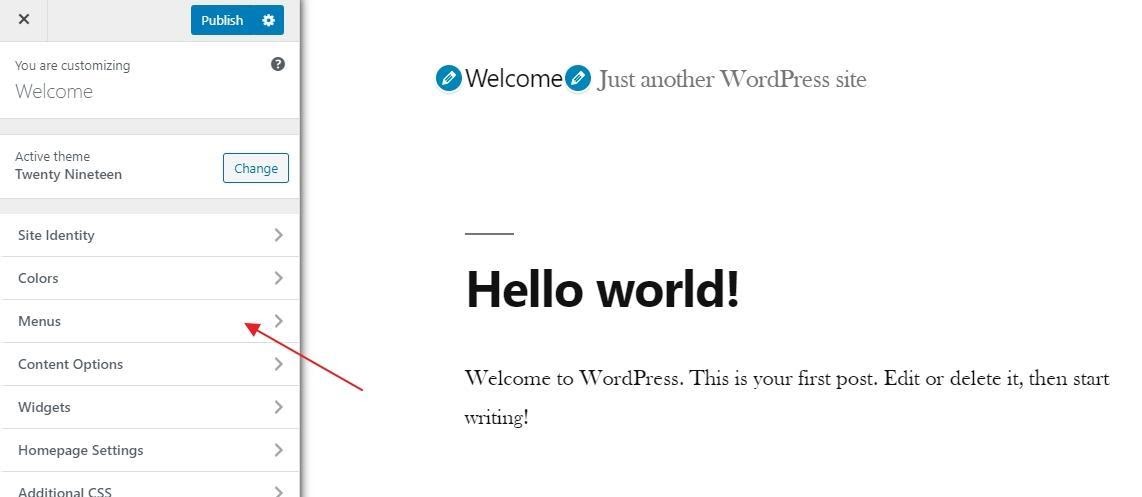
This will bring up the Menus page. There, you will find the Menu you already created in the step above or you can create a new one.

Click on the menu you have created. Click on Add items on the next page to select elements for your menu from the pages you already have.
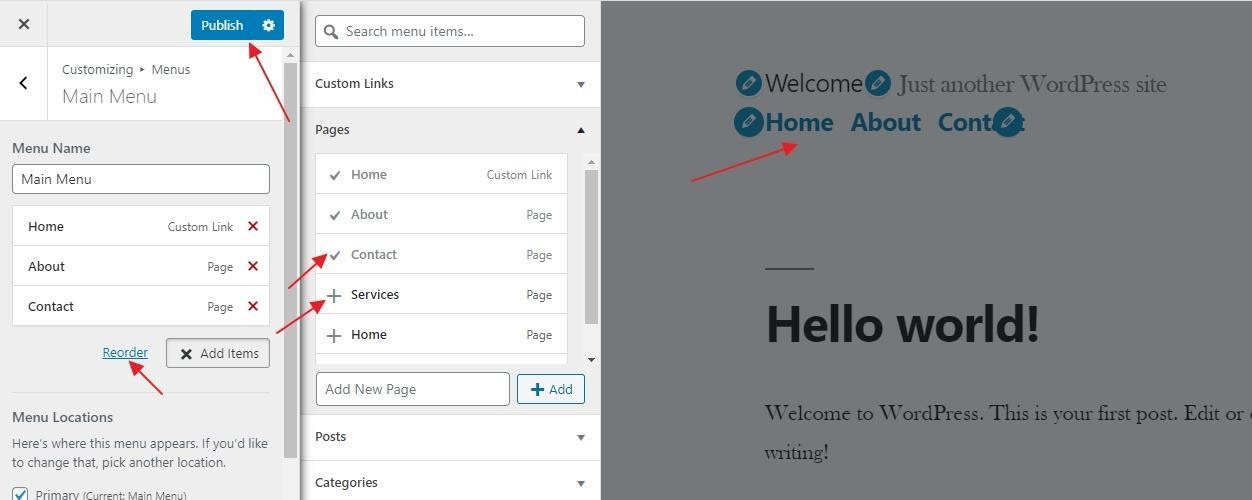
As you add the pages, you will see how it looks in the preview window to your right. If you don’t like the order of the pages, click reorder to arrange the elements in the way you want. When you are satisfied, click on “Publish” so the changes will take effect.
Installing Plugins
Plugins are an important feature of WordPress. Think of them as the apps on your mobile phone or the Extensions on Google Chrome. They bring some cool features and save you the stress of performing certain functions.
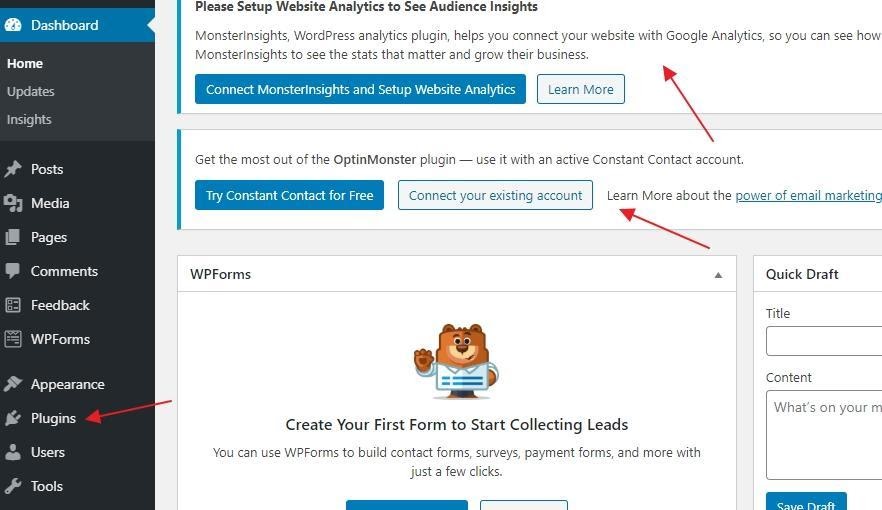
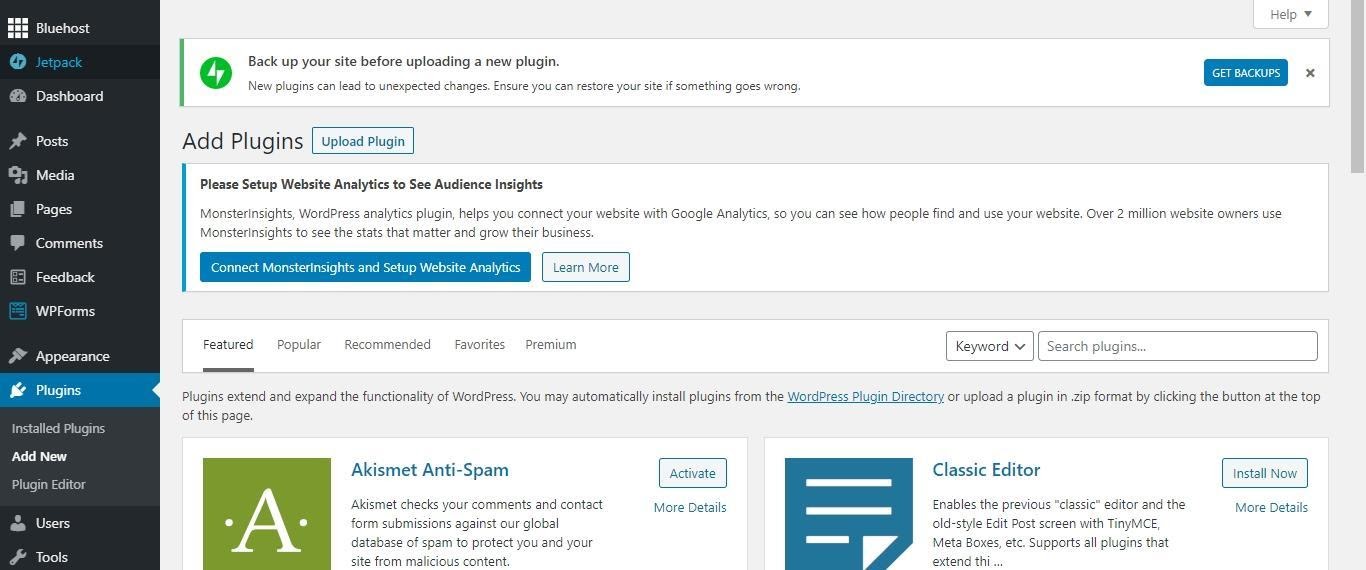
You will find adverts for plugins on your WordPress dashboard. Install the ones that appeal to you. However, there are more than 45,000 free plugins to choose from in the WordPress store. Click on the “Plugins” tab in your dashboard to see the plugins you already have. To find more plugins, click on “Add New”.
Once inside the WordPress store, you can search for the plugins you are looking for or check the “Popular” and “Recommended” tabs for plugins you might need.
For paid plugins, check the premium tab.
It is understandable if you act like a kid at a candy store at this point. However, you don’t need to use dozens of plugins. You only need some of the best that applies to you. In many cases, you won’t need more than six plugins to run your WordPress Site.
During your one-click WordPress install, some plugins were downloaded automatically. Check the plugins page to find them. Activate the plugins you need, and deactivate the others. Some plugins you definitely need at first that may not come with the installation include:
- WPForms Lite – This plugin allows you to add a contact form to your WordPress site.
- MonsterInsights – This plugin allows you to connect your website with Google Analytics to see how visitors find your website, the content they love to read, their geographical locations, the amount of time they spend on your website and more. There is a premium version of this plugin, but you’ll probably not need it in the early stages.
- Yoast SEO – This plugin helps you to create pages and content that are search-engine friendly. With search-friendly content, you can attract more people to your website.
- WP Super Cache – It is designed to improve your website speed by serving cached pages.
- Sucuri – This plugin scans for malware and generally scans your WordPress site for any security concerns.
How to Add SSL Certificate to Your WordPress Site
SSL (Secure Sockets Layer) is a security technology used to ensure an encrypted connection between a browser and a server. With this connection, all data transmitted in a browsing session are protected from prying eyes.
A website with a valid SSL certificate can process usernames and passwords, credit card information, social security numbers, and any such sensitive information safely and securely. At a time when cybersecurity is a hot topic, an SSL certificate is a necessity for most websites on the web today.
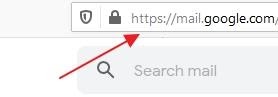
The address of websites with SSL certificates installed to start with HTTPS (HyperText Transfer Protocol Secure).
You can also watch out for the padlock. Clicking on the padlock will bring up some details about the safety of the website.
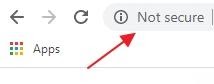
On Google Chrome, the identification process is even better.
Google has made it easier to identify sites without valid SSL certificates by marking them as “Not Secure”. This is bound to have a negative impact on your website’s rank on the search engine.
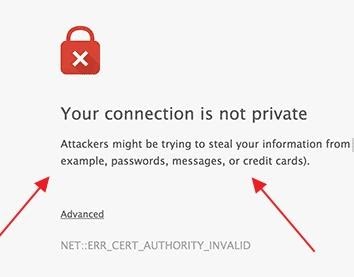
Each SSL certificate is issued for use on one website. If a website has a fake certificate, most browsers will point this out with a warning when someone tries to access the page.
You may be wondering why you need an SSL certificate for your non-commercial WordPress site. However, it is not meant for only E-commerce platforms. There are two reasons why you ensure you have a valid SSL certificate on your website:
- Google says so (read necessary to appear prominently on search engine results pages)
- Web users are very security conscious these days
In our example above, we saw how Google highlights websites without valid SSL certificates as “Not Secure”. This started in July 2018. However, it didn’t end there. Google also stated that sites without SSL certificates will be penalized SEO-wise. This is why millions of websites have already completed the migration and you should too.
Secondly, the average web user is careful when navigating any website without a valid SSL even when there is no immediate danger (such as entering private information or banking details). If a user lands on your website tagged as “Not Secure” on Google Chrome, they will most likely never return. Apart from the security concerns, it paints a picture of unprofessionalism.
If you intend to accept payments, the biggest payment companies will not welcome you onboard if you don’t have SSL.
Install SSL on WordPress as a Beginner
The first step to installing SSL on WordPress as a beginner is to buy your SSL certificate. If you purchased your domain and web hosting with a top web hosting provider like Bluehost, you most likely have a free SSL certificate already.
In such a scenario, you don’t have anything else. If this doesn’t apply to you, however, you can purchase an SSL certificate from a reputable company for around $50-$200 depending on your unique needs.
Once you have your SSL certificate, follow the steps below:
1. In your WordPress Dashboard, click on Plugins>Add New
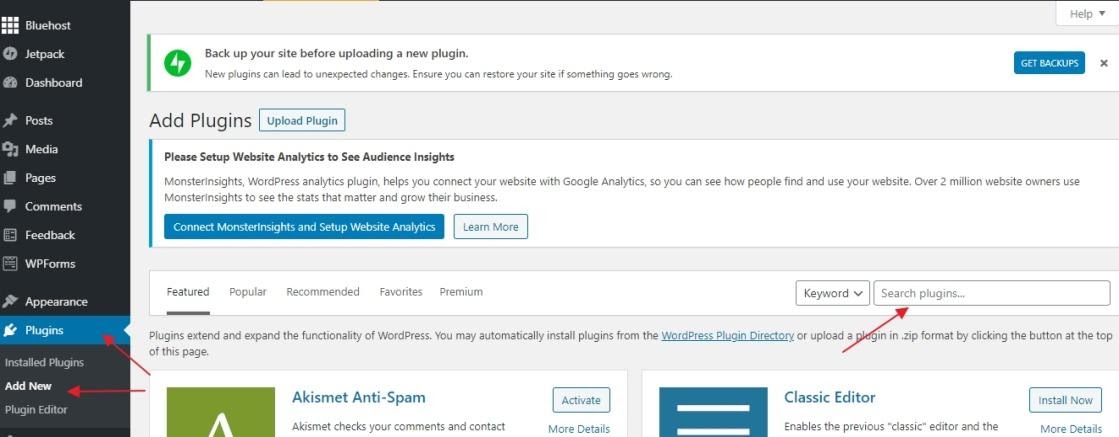
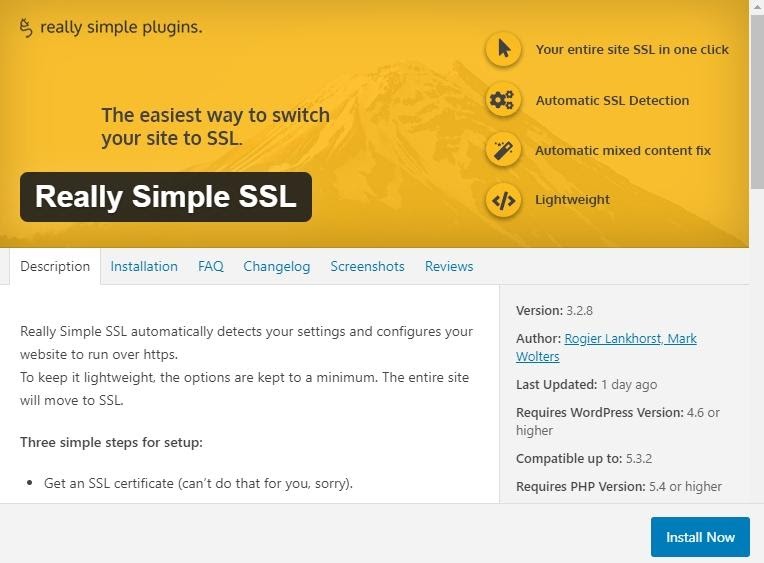
2. Find Really Simple SSL plugin by typing it into the search bar. Once found, install and activate it.
3. Once active, click on Settings>SSL to bring up the plugin page and complete the process.
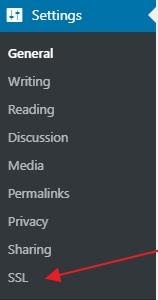
This plugin automatically detects your SSL certificate and will help you complete the migration from HTTP to HTTPS in a few clicks.
If you are using this plugin, keep it activated at all times to avoid any technical glitches.
Updating Your WordPress Site
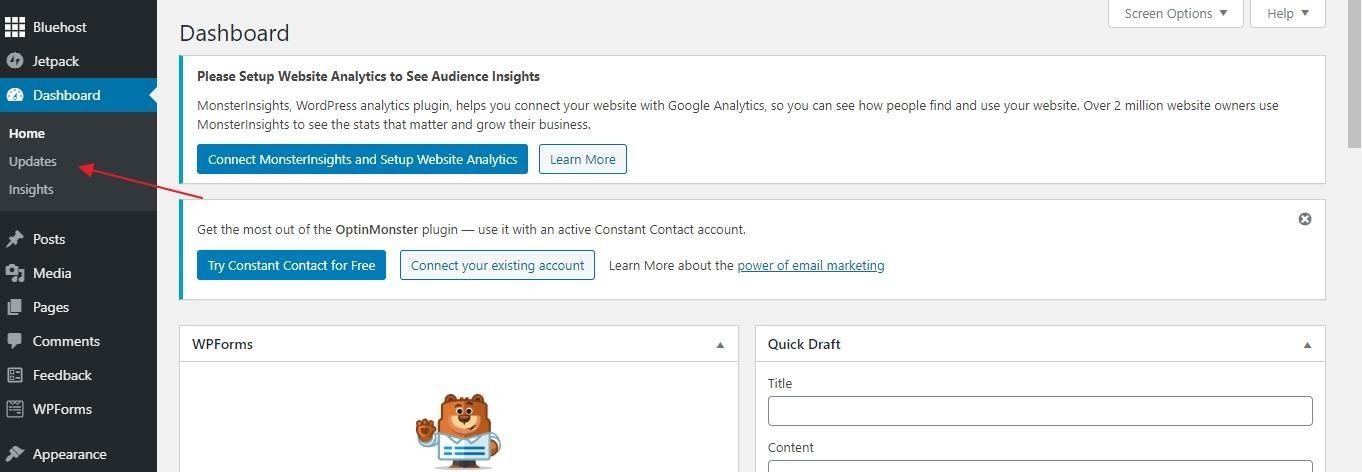
To update your WordPress site, click the “Updates” tab to bring up the right menu. WordPress updates itself from time to time so you will rarely ever have to push an update by yourself. However, the plugins and themes you have installed have to be updated manually.
Once you have themes and plugins that need to be updated, you will find a counter next to the tabs.
If you get an update prompt, it is important to update it as soon as possible. Themes and plugins that are not updated may affect your website performance and expose you to security threats. Since WordPress is an open-source platform, many bugs and security concerns are tackled immediately by the community. You can only benefit from this by updating immediately there is a prompt.
Backing Up WordPress Site
By backing up your WordPress website, all your data and is kept in alternative storage outside your current database. WordPress backups help you to avoid losing all the work you have done on your website in the event of a cyber-attack or anything that can damage your website content.
A broken plugin and a problematic update are other examples of factors that can break your website. With a backup, you can restore your website to the last time it was functional. If done properly, backups can save you from starting all over.
As a beginner in WordPress, backups may not be your concern in the first few months as your site may not have much content or traffic. When you feel the need to update your website, you’ll find various alternatives. However, using a WordPress plugin for your backups is usually the fastest and least tasking option.
The All-In-One WP Migration plugin is a popular option.
When you have installed and activated the plugin, you can use it straight from your dashboard. It allows you to save your website data on your computer or on your Dropbox account (or similar services like Google Drive and OneDrive).
Optimizing WordPress Performance
As you load up your WordPress website with content and plugins, it will gradually begin to slow down. These days, everyone, from search engines to your target audience will frown at a slow website. This is why you must optimize your WordPress site from time to time.
To determine the speed of your website, you can use tools like Google Pagespeed Insights or Pingdom. If your website takes longer than three seconds to load, you need to optimize for speed.
Some of the reasons why your WordPress site is loading slowing include:
- Picking the wrong web hosting solution
- Not using caching solutions
- Using poorly configured plugins
- Wrong choice of advert solutions (heavy banners, use of scripts, etc.)
Plugins come in handy when optimizing your WordPress site speed. Two of the best options include the Browser Cache plugin and Page Cache Plugin. Install and activate any of them and they can improve your website speed.
The Browser Cache Plugin decreases the number of requests per page. This allows it to reduce the load on the server. When a user loads your website, the plugin stores elements like images, CSS, Javascript, etc. on the browser so that they don’t get loaded all over from the server with subsequent requests. The Page Cache Plugin works in a similar manner by reducing the number of executed database queries.
Best Practices for Optimum WordPress Performance
The process of keeping your WordPress optimized never ends. Since it is an on-going process, here are some best practices to keep in mind:
- Keep your WordPress site updated. We have highlighted the process of updating your website above. By ensuring that the latest versions of WordPress as well as all plugins and themes are updated, you will keep your website optimized for security, speed, and functionality.
- Avoid heavy WordPress themes. Overloaded themes contain too many features your website probably doesn’t need. Change to lightweight option to better performance. Keep in mind that some lightweight themes can get heavier with updates. If this is the case with yours, consider changing the theme.
- Optimize your comments. When you start a WordPress site newly, the comments on your post will be few and far between. However as the site attracts more traffic, the number of comments will grow. This can affect the performance of your site. To avoid this, return to “Settings” on your WordPress dashboard. Click on “Discussions” to bring up the window for changing the comments settings. Check the box that says “Break comment into pages”.
- Delete any themes and plugins that are no longer necessary. Unused themes and plugins on your WordPress website can slow down your website because they are still stored on your web hosting account.
Elevate the Look and Feel of Your WordPress Website
When designing your WordPress website, it is important to keep in mind that the design elements you choose are not just mundane niceties. They can make or mar your brand. When a visitor lands on your webpage, they form quick opinions on your brand’s credibility.
To further elevate the look and feel of your website to a level where the average user will trust your brand, there are a few more things you need to do.
Create a Logo
A logo instantly communicates the professionalism of your brand. It is a visual representation of what your brand is about, and is how your target audience will identify you across the web.
Fortunately, you no longer need to be a graphic designer to create a compelling logo that captures your brand’s essence. Solutions like Canva and Designhill, have simplified the process. You can create a logo from scratch by selecting elements that agree with your niche or pick from existing templates. They are free to use at the base level.
If you’d like to stay away from the logo design process, there are other paid options for generating a high-quality logo. These generally include freelance marketplaces like Fiverr, PeoplePerHour, Design Crowd, 99Designs, and more.
When you have a logo for your website, you can upload it to your website from your WordPress dashboard. Click on Settings>Appearance>Customise. This will bring up the page below:
![]()
Click on Site Identity to complete the upload process.
Upload a Custom Site Icon/Favicon
Site icons are the small logos displayed on browser tabs. They are an important feature as they ensure your page stands apart in the midst of dozens of open pages on any browser.

You can use your logo as your site icon or design a unique icon that retains elements of your logo. The upload process for your site icon is the same as uploading a logo. In the Site Identity tab, you will find the Site Icon upload tab.
![]()
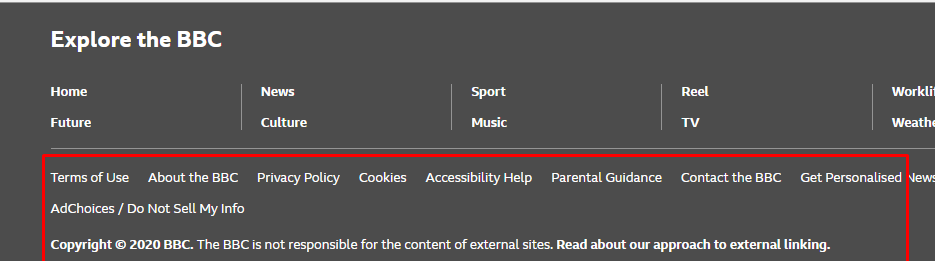
Optimize Your Footer
The average web user is accustomed to seeing certain elements in a website’s footer. Elements such as copyright notice and privacy policy must complement other such your About and Contact for a completely professional feel.
WordPress automatically leaves the statement “Proudly powered by WordPress.” This message can water down your brand message and make your Website look unprofessional. To avoid this, design a custom footer that includes your logo, copyright notice, and other relevant elements.
Here is an example of a professional footer:
Other brands have something similar.
Add Privacy Policy and Terms of Service
A Privacy Policy protects you from legal issues in the future and should feature prominently on your website footer. Not sure how to create a privacy policy for your brand? There are tons of free solutions on the web.
Similarly, you also need terms and conditions to cover any legal loopholes that may have been omitted by your Privacy Policy. With Terms of Service, you can restate your right to certain actions such as banning offending users, preventing people of a certain age from accessing your website and more. You can also generate free terms and conditions from many free platforms.
However, if you run an e-commerce business or other similar high-risk businesses on your WordPress Website, a carefully written Privacy Policy and Terms of Service is important.
Create a Social Profile for Your Brand
Social media is an integral part of the web experience today. The average web user expects all reputable brands to have a social media page. To further enhance the professional feel of your WordPress website, create social media pages for your brand, and then highlight them using WordPress Widgets or Plugins like WP Socializer to get your readers to follow your page. The right plugin will also make it easy for your readers to share your content.
Conclusion
You have learned how to get a website by purchasing a domain name and a web hosting package and creating a fully functional WordPress site. You have also learned how to design your WordPress site to make it appear unique as well as how to create pages and posts.
That is 90% of the job done! From now, you can make quick changes to your site, add new content and focus on making your website the best it can be. Do not try to do too much in the early days. Your focus should be on making your website as attractive as possible to your target audience and of course, the search engines. Once you sorted the basics, start creating content to populate your page.
FAQs
What do I need to build a WordPress website?
The three main things you need to build a WordPress account include a domain name, WordPress-supported hosting, and one hour of your time. Our tutorial above has simplified the process for anyone looking for how to use WordPress.
Can I make a website for free with WordPress?
Absolutely! With our tutorial, you can create your website without paying anyone. If you want a professional website, however, you have to pay for hosting and a domain name. If you are looking for how to create your own website for free, WordPress is one of your best options.
How Much Does it Cost to Create a WordPress Website?
There is no hard and fast estimate of the cost of creating a WordPress website. This will come down to your specific needs. Do you want a personal or small business website? It will cost around $100-$200 a year to create such a WordPress website. Do you want to customize it or use the templates provided? As the complexity changes, so will the cost. Some WordPress websites can cost as high as $30,000 to create and maintain for a year.
Most of the cost of creating a WordPress site will go towards your web hosting. So the key to coming up with a budget without the risk of overspending is to decide on the scale of web hosting you need NOW. With web hosting providers like Bluehost, you can start small and grow in the future at your own pace.
What’s more, most hosting companies include website templates and website builders as part of the hosting solutions they’ll offer you at no extra cost. If you’re unsure of the free versus paid tools included in your hosting plan, do not hesitate to reach out to your hosting vendor’s customer support.
Is WordPress the best website platform?
Although there are many options for building a website, we recommend sticking with WordPress. It is the best website platform for a beginner and also trusted by millions of professionals around the world. WordPress powers nearly 30% of all websites on the internet today, and 52% of all content management systems. The free themes, plugins, and widgets make WordPress highly flexible.
Is this WordPress Tutorial Comprehensive?
Yes, with this WordPress tutorial you can learn how to create a website in minutes. It is divided into steps to ensure that anyone can go from registering a domain to posting their first blog post in less than a day!
Can You Help If I have other WordPress-Related Questions?
Absolutely! If you’d like to discuss other WordPress-related issues that are not covered in this step-by-step guide, please reach out to us and we will gladly help!